Showing posts with label Amy Butler Style Stitches. Show all posts

Monday, February 7, 2011

I won!

... the January Amy Butler Style Stitches Sew Along fabric giveaway!

Seems only fitting that I use these for future AmyB sewalong projects if I can match these prints (AmyB Geisha Fans, and Alexander Henry Abstract) to good bag choices:


The Alex.Henry abstract will be a challenge, but I'm up for it. As soon as I've earned a longer break by getting some "real work" (vs. fabric fondling) done, I'm going to make a cup of tea and sit down with the book and daydream about the possibilities.

Thanks SewAlong organizer Bree, and Jan. sponsor SewSweetness!

Tuesday, February 1, 2011

Sitting this one out

I dropped my sewing machine off at the BabyLock dealer for servicing yesterday, which means all active sewing steps on various works in progress are on hold. That makes this a good time to fondle my stash and cut more of it up.

I thought I'd get started on February's project for the Style Stitches Sew-Along: the Reversible Everyday Shopper.
I like the reversible idea a lot. I like the one big pocket either-side-out thing. But once again this bag is huge: a whopping 19" high, 16" wide at the base/13" at the top, and over 5" wide. Fill that baby up and carry it around for a while and you'll be crying for a chiropractor. And Amy, sorry, but I don't much like the shape or proportions of this one, something that you usually do so well.

This seems like a good choice for mothers of multiple young children who need to carry several bushels of what-have-you around every day, and who are fit enough for pack-horse duty. I'm reasonably fit, but don't have young kids or any need to carry vast quantities of personal items with me much of the time. Nevertheless, the "sew your way through the book" appeal is strong, and as you know I have no qualms about shrinking a pattern, so I was on the fence about this... until I googled the bag and read this post . Check out those real-world photos.That's huge!
It's not that we don't use tote bags, and large ones. We do. We carry home vast quantities of local produce from the Hilo farmer's market every week, and do most of the rest of our shopping at health food stores that have bring-your-own-bag policies. So we do use market totes. Lots of them. I did a quick count and found 12 errands bags for a two-person household, and there's probably another one or two in the car.

All that aside,what really stopped me was the lack of a good fabric pairing for this one. It's made of home dec fabric, of which I have some lovely pieces in the stash. What I don't have is two lovely pieces that look good together. So I'd either have to shop for fabric (nixed by my "make it from stash" vow), or make the bag from a single fabric.

I'd be willing to do that if I loved it enough to use some of my lovely stash fabric on it, but I don't. Or if I needed another tote, which I don't. Or if I could think of a friend or family member to gift the finished item to, but everyone I know is already weighed down with more totes than they have use for. Except possibly my Mom, but she's in her 70s and giving her a bag this size could consitite elder abuse.

So I'm going to sit this month out. It's not like I need to make another bag just for the fun of it. I've got plenty of goodies-in-progress in the sewing room to keep me busy. And I might jump ahead to April and get started on the Checkbook Cover, which I really do need. It's a nice one:
 ... but again, bigger than necessary.
I have multiple checkbooks for our various business and personal accounts, and I want them to look nice while taking up as little space as possible. So this pattern, too, is heading for modification.

Saturday, January 29, 2011

Repairs and a possible fix

Thanks for your comments on the Cosmo Bag!

Alas, a new needle has not solved the swishy sound my machine now makes with each stitch. Best guess is the metal shank thingie that moves the needle up and down is gently brushing against something else inside there out of sight. It's not interfering with performance (yet), but it's like an ill-fitting sneaker: you can go for a run but might come home with a blister. Further investigation will be left to the repair guy.

In the meantime, since it's now the weekend and the machine is still sewing okay, I probably won't be able to resist a few more seams before I take it in on Monday. And since the next 'palooza block will go live on Monday morning, I might even do that first thing. We'll see how any further weekend sewing goes.

Marie-Christine, something in your comment on shrinking curves led me to think about (next time) using some kind of light-weight, maybe wash-out, fusible strip to hold the edges of the clipped and turned-back curves in place. Having shrunk the pattern, I was working both with a narrower seam allowance (3/8" instead of 1/2") and a tighter curve, which I clipped generously. All those little clipped seam allowance bits did not stay pressed back, and wrestling with two facing layers of that and the curve was more work that it should have been. A strip of some kind of adhesive that would not interfere with sewing would have helped a lot.

Any ideas, readers? I haven't used that kind of product before, but I know they exist. It would have to be something narrow, that would follow a curve without puckering. I could even pick some up when I take my machine in on Monday.

Meanwhile, I'm previewing February's project, the "Reversible Everyday Shopper," and already thinking about how I'm going to change/resize that one.

Friday, January 28, 2011

The Bag that Broke My Machine

My "Cosmo" Bag (January's kick-off to a year of Amy Butler accessories) is finally done, and I'm about done in.
Folks, making my own jeans -- which I did last year -- was easier than making this bag!

Amy, honey, I love your style, I love your fabrics, I love your books, but you are insane to rate this one "easy."

Maybe that's partly because I reduced the pattern at 78%, so the inside handle curve is smaller and less maneuverable. (Worth it, for a bag that will be more everyday useful to me; I don't need a gigundo one very often.) But maybe not. Amy's instructions sometimes seem to be written for ease of explanation more than than for ease of construction. I may not be the most expert or experienced seamstress on the block, but I'm not new at this. I have a reasonable skill set to draw on. Even so, the final steps of this bag kicked my butt.

And messed up my machine.

I was doing the final edge-stitching along the inside handle curve -- with just six more inches of stitching to do before all that remained was hand-sewing the button -- and as we climbed a mountainous pileup of interfaced seams at the corner of the band, something made an ominous popping sound.

I thought I'd broken the needle, but it's okay. I was able to finish stitching, and all's well visually: no horrific nest on the bobbin side. But now there's this kind of swishy sound with each stitch, which means something got knocked out of alignment.

First I'll try replacing the needle (I'd planned to switch to a new one after this project anyway), in hopes that the problem is a slightly bent needle. If that's not it, I'll be taking my stalwart friend in for servicing. At least I'll have a pretty bag to tote along as I drive to the BabyLock dealer. Here's the inside:

Finished dimensions of this one are...
Width at the base: 11"
Across the widest part: 15"
Depth at the base: 4"
Depth at the top: 3"
Height to top edge of center band (at the middle, above the button): 10.5"
Height with handles: 20"

Oh, and I added a piece of heavyweight box board to the bottom, for stability. I slipped it in between bag and lining before completing the final (gruelling) step of sewing the inside handle edges together.

For those just tuning in to this project, here are my comments on:
Binding the pocket edges
Doing the center band my way
Taking a few liberties with the lining

The true test of this bag will come when I use it. I think I will like it, but no way will I make it again until enough time has passed that I've forgotten how tedious fusing all the interfacing was -- or until little elves show up to do that sort of thing for me and to erase from memory the trickiest and most irksome bits.

If you're a beginning sewer and tempted by this bag, just put the book down and walk away. Start with something simpler like the Birdie Sling before tackling this one.

Tuesday, January 25, 2011

Cosmo Bag - Lining Details

I took a few minutes away from desk stuff this morning to get the main lining pieces for the Cosmo Bag ready to assemble. As usual, I did a few things differently, and thought I'd share those details at the flat stage, while they are easy to photograph:


Changes:

1) As you can see, I added a band detail to the center top of the lining (Amy's version has this piece only on the outside). This is purely decorative. I cut two "band" pieces (one for each side of the lining) from the lining trim fabric. They are not interfaced. I stay-stitched a generous 1/4" inside the bottom curve, then notched the seam allowance* and pressed to the back. The bands are placed on top of each lining piece, with upper raw edges even, then edge stitched along the bottom to hold in place. I also ran a line of stitching just inside the top edge to keep that from shifting when I put the entire bag together.

* If you're just tuning in, you should know that I am making a smaller version of this bag, having reduced all the pattern pieces at 78% on our copier. This reduces the seam allowance, too, so while Amy's instructions call for 1/2" seams, I'm using a 3/8" seam throughout. For a full-size bag, the stay-stitching should be at 3/8", not 1/4" from the edge.

2) I'm using the lining trim print for the interior side of handles (exterior fabrics can be seen here).

3) I cut the pocket for this side of the lining about an inch shorter than the other one. These are deep pockets, and I thought having one side a bit shallower might be useful. On the other side I added a line of stitching in the center to divide into two equal-sized pockets. On this side I moved that line to the side (it didn't show in the pic, so that's indicated by the bright yellow line), for one bigger and one smaller pocket.

On a full-size bag this larger pocket would probably be too big, and I'd most likely have dividing one side into two and the other side into three pockets.

4) I added a fake tag from a scrap of red fabric, purely for fun. I'd say I do this on everything I sew, but truth is I often forget. I'm glad I remembered this time, because it will make me happy each time I see it. Plus, sometimes it's useful to tell one side of a bag (or garment) from the other at a glance.

So that's where I'm at with this as of this morning. I might get to assembling the lining this afternoon, but that's not a sure thing. I'll show off the completed bag as soon as it's done.

Monday, January 24, 2011

Cosmo Bag Progress - exterior done

It took a long time to get to completing next steps on my Cosmo Bag for the Amy Butler Style Stitches Sew-Along, although the exterior is now done:

It will look better when I get around to pressing the side seams, which I have not done yet.

First, there was a slight delay while I contemplated the instructions for Step 5 (attach the bands to the main exterior pieces) then walked away.

It's not that piecing two reverse curves together intimidates me. Stay-stitching, clipped or notched seam allowances, getting one concave and one convex curve to make friends: I can do all that. It's Amy's method that seemed all wrong to me. For one thing, why wait until after you've wrestled the two pieces together to notch the seam allowance, when doing that first makes fitting the curves together so much easier (yes, it does mean sewing a line of stay-stitching before the seam, but she has you do that on the handles, so why not here?). And then, "ease the band around the curve on the bag exterior" ... ?!? Um, no, the way to get two curves to play nice is to fit the concave one (the bag exterior) to the convex one (the band) and sew with the convex one on the bottom. Really. It just goes so much more easily that way. Especially when both pieces have a layer of interfacing fused to them, which doesn't exactly help with that "ease" into place requirement.

I considered giving Amy's way a go, just to be fair to the instructions, but I'm not that kind of a seamstress. I came back to it yesterday and did it my way. Which, after a brief moment's thought, involved staystitching along the edge of the band, notching and pressing the seam allowance to the back and then simply top-stitching that piece into place onto the bag exterior. Quick and easy, no wrestling required. Probably not as strong a bond, but that curve isn't going to be taking much of the weight of bag contents anyway, so I don't expect it to be a problem.

Handles and handle inner edge prep were no biggie, so that's all done too, as is assembling the sides to the main body pieces and attaching the bag bottom (although I didn't exactly follow the instructions there, either).

Pic at the top is where I'm at so far: exterior done, waiting for me to get to the lining assembly.

I did add one step that might interest others constructing this ginormous bag. I like the look of the outside pockets, but they are both narrow and very deep, which strikes me as a poor combination. (Keep in mind that I reduced this bag size, so those side pockets are very narrow for my hand. I don't see keeping anything other than maybe a pen in there, and would like to be able to get it out again.)

So, I shortened both the side pockets by aligning the lined pocket pieces over the bag side pieces. Amy has you baste these in place by sewing along the sides and bottom at this stage, which is the kind of extra step I just laugh at. Plus, if you do that, you won't be able to do this:

I flipped just the top layer of the pocket up (to the left, in the pic; you're seeing the white interfacing side folded back), leaving the lining in place, and stitched a line across about 3" up from the bottom. Flip the pocket exterior piece back into place before sewing up those side seams. Now the pocket isn't too deep, and that seam is hidden, rather than having a line of stitching show across the outside of the pocket.

Saturday, January 15, 2011

Cosmo Bag: bound pocket edges

I'm starting to assemble my Cosmo Bag for the Amy Butler Style Stitches Sew-Along. As mentioned previously, I'm using a solid fabric to line the pockets. But I like the detail of a contrast fabric at the top of the exterior pockets, so I used a separate strip to bind those edges. I didn't try to match the strip length to the pocket width, and will trim the excess later.
 
I cut the pocket exterior and lining pieces the same height (rather than the lining being a bit taller, as the pattern dictates), and a binding strip a scant 1.25" wide. Sew one side of the strip to the top of the pocket exterior, and the other side of the strip to the pocket lining (I used a 1/4" seam), then press the seams toward the center of the binding strip, like this: 
 

Flip the lining over so wrong sides are together, and line up the bottom and side edges. Press again, and the pockets are ready to go, like this:

If you'd like the finished contrast a little wider, use a wider binding strip and a wider seam: a 1-5/8" strip with 3/8" seams would probably do it, but I haven't tested that so you might want to do up a little sample before applying to your pockets.

The interior pockets are lined with the same blue solid. I decided to bind those top edges, too, in a different print:
More progress reports to come...


Sunday, January 9, 2011

Cosmo Bag preview

I spent most of yesterday afternoon auditioning fabric for the Cosmo Bag (January's project for the Amy Butler Style Stitches Sew Along). Here's one of Amy's renditions, from the book:


I'm determined to "shop the stash" for as many of these bags as possible, and so far project #1 is already a challenge. The stash yielded three contenders for the exterior print, but finding good lining/trim pairings wasn't easy. In most cases the "best" combination wasn't as spectacular as I was aiming for, or I had a great fabric in insufficient quantity. I considered Kaffe's "Big Blooms" in red, which I have a nice large piece of:

... but decided to save it for the "Miss Maven Ruffled Handbag," coming up as November's project (by which time I am sure to have changed my mind). Instead, for the Cosmo, I'm using two recent purchases from Jane Sassaman's "Hothouse Garden" line for the main exterior and lining pieces, with some Kaffe "chevron stripe" in brown, and my fave green leaves for trims:

As you can see, I do not believe in pressing my fabric before cutting unless it's so horribly crumpled it won't lay flat enough to pin a pattern to. Perhaps some day I'll regret it, but so far this particular lazy habit hasn't tripped me up.

It took me hours to cut all the pieces last night, and almost as long to cut out all the interfacing this morning. This is most, but not all, of it. Still a couple lining pieces to go, but I needed a break.

I love Amy's style, but that woman must carry half her life around with her: her bags are huge. Much bigger than I have any use for. The Cosmo bag might be her largest yet. A full-size Cosmo would make a good beach tote, but I doubt I'd be willing to subject what will be a stunning bag, representing lots of time and effort and fabric investment, to bright sun, salt air/water, sand, and possibly spilled suntan lotion.

So I'm making a smaller one. I cut out all the pattern pieces and reduced them at 78% on our home copier. I measured the tote bag I get the most use from, and based on that probably should have aimed for reducing at 85%, but was not in a mood to figure out how to override the copier presets.

With smaller pieces, I was able to make efficient use of interfacing. The book calls for a whopping 6 yards, but I got all my pieces cut from 2-1/4 yards. I am not going to interface the pocket linings, btw. And I cut the pocket linings from a blue solid... why use the good stuff on the pieces that will be out of sight? I like the side pocket detail where the top of the lining is folded over to make a trim, so have cut separate trim strips for binding the top pocket edges (inside, too).

More details to come as I put the bag together. Most likely I won't tackle that until next weekend. First, I have to go plug in my iron and fuse, fuse, fuse a lot of fabric and interfacing. By the time that's done I won't want to look at this project for several days at least.

Monday, January 3, 2011

Amy Butler Style Stitches Sew-Along

Like I need to start any more projects.
amybutler-button2

I already have the book, though, and love the Origami Bags (the only thing I've made from it so far). Without a sew-along there's little chance I'll do other than think about making more stuff from the book. So I'm in.

First, though, I need to stop by the fabric store and stock up on interfacing. Man, that Amy loves to pile on the interfacing. And fusible fleece. I'm out of that, too.

Biggest challenge: I want to make as many of these projects as possible from stash. Coordinating prints and linings included.

We're starting with the "Cosmo" bag (that's the one on the cover). Funny, 'cause Cosmo loves to crawl into any kind of open bag. If I'm smart, I'll choose a dark fabric for minimal cat-hair contrast.

Thursday, December 9, 2010

Amy B. Origami Bags - Set 2

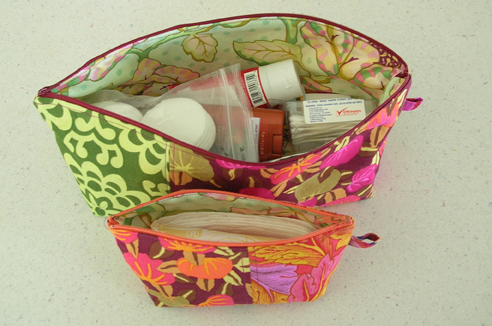
Here are the other two Origami Bags I made from (from Amy B's new bag book):

The larger one is 14" across the top, the smaller one 7". That's the last small bit of the orange leaf print, which I wish I had more of. Both these bags feature my fave "Persimmons" by Kaffe Fassett. I have very, very little of this left so was thrilled to find it on sale at Fabric.com, and could not resist ordering 2 yards to replenish the stash.  Even though I am not supposed to be doing ANY stash-building until substantial yardage is used up.

My questionable logic is that, technically, "virtual Santa" bought it to go under the tree, but still. More fabric. 2011 will be all about stash busting, because I am close to the point of having no room for more yardage (not to mention a drained hobby budget!).

The larger bag is Amy's proportions. It holds all kinds of bathroom stuff, and got use again last weekend on an overnight getaway to Kona. Amazing how a couple hours in the car and a night at a resort feels like getting away for days. Hoping for more frequent short getaways next year.

The front one is taller than Amy makes 'em, accomplished by taking a very shallow corner seam. It is perfectly sized for those "feminine necessities" we sometimes need to have at hand. Both these have that lovely Heather Bailey print inside. I was so happy to find a good use for that print. It's lovely, but a little too pretty/girly for other purposes I'd considered. It's perfect to line these bags.

I look forward trying out more patterns from Amy's book, after I get some more XMas sewing done.

Wednesday, December 8, 2010

Amy B. Origami Bags - Set 1

So, I'm really slow getting these pics up. Here, at last, are the first of the Origami Bags (from Amy B's new bag book) I made for corralling travel stuff. I strayed from Amy's exact sizing on some of these, as I was using whatever caught my eye from the scrap drawer, and with whatever odds and ends of mid-weight fusible interfacing I could find.

This is the smallest one. If I'd blogged this closer to sewing day I would remember more precisely how it might vary from the littlest Origami pattern in the book, other than it's made from just one piece of fabric on each side, rather than having pieced sides like all the others. 
I also made it a bit longer than the pattern, partly because I only had a narrow piece of this fabric, and also to fit the intentended contents, which were my pink iPod Nano and my ancient cell phone + earpiece, as you see here. This one came along in my purse. That's a Kaffe Fasset print on the outside, Heather Baily on the inside.


These two are a bit larger. The green one in front was the first I made, so it's the most accurate rendition of Amy's sizing and proportions. That came in my purse, too, as it held the requisite 1qt. zip-lock baggie of hand sanitizer etc. Sure, I coulda just stuck the plastic baggie in my purse, but who doesn't like pretty fabric better than plastic?


This whole project started when I made the green one, thinking it would be handy to corrall all the powercords and rechargers I was taking with me. But, duh, I didn't pay enough attention to the photos and diagrams in the book when I selected what size to make, because these bags are all about 2" longer at the zipper than they are at the base. So when I got the first one done, and went to fill it up, it turned out to be just a little bit small for the purpose.

So I made another: the pink and orange one in the back. It's about 12" long and intentionally wider/flatter than Amy's design (accomplished by taking a deeper cross-seam when forming the corners of the base). From a purely design standpoint, the proportions of this one are not as pleasing, but it's the perfect size for everything I wanted to stash in it: chargers and power cords for the camera battery, the iPod, the cell phone, and my Kindle. It holds a lot of cords. This one went into my suitcase, and I was very pleased with it.
These were so quick and fun, I made two more. Which I either never took or have lost the photos of. I'll remedy that shortly. They are just like these three, only slightly different.

If you are looking for an excellent last-minute homesewn gift idea, I highly recommend one or more Origami bags. BTW: the book calls for making these from home dec weight fabric, but as you can see, quilting weight works just fine, too. And don't worry about having exactly the interfacing called for. I used probably three different kinds and weights in my not-matching set, with no problem at all.

I would have made some of these for XMas gifts, but I used up all but tiny scraps of my mid-weight interfacting stash on the ones for myself, and haven't managed to restock yet. Maybe next year.

Saturday, October 2, 2010

my best friend: the seam ripper

Still waiting for that USB camera card reader. Online tracking says it left Honolulu yesterday, so should arrive in my PO Box today, but I've got too much to do to drive over to the other side of town to pick it up. Maybe I'll have some fresh pics for you on Monday afternoon? If I'm not too frantically trying to catch up on everything I have/want to do before departure for the east coast on Tuesday am.

Lots of sewing this week. A bit too much. I do best with short sewing sessions. When I keep going and going I am prone to stupid user errors. Like sewing the yoke onto my black stretch twill pants (Jalie 2908, wide legged version #2) backwards. A fixable error, but one I wish I'd noticed before I zigzag-finished the raw edges and added two rows of top-stitching. Oh well. It's all been picked apart and pressed back into shape, and as soon as I finish up here and get a little more caffeine in me I'll go put it back together again the right way.

I also produced an epic fail of Vogue 8323, the cowl-neck version:

It sewed up easily enough. I reduced the (ginormously long) cowl by half, by cutting on the "fold here" line, and stabilized the shoulder seams. But I wanted full-length sleeves, and when I tried it on the weight of the sleeves pulled the cowl neck sideways and that mid-shoulder princess seam ended up off the edge of my shoulder. The problem is that my fabric, although "light weight" as in thin and stretchy, is too "heavy" (as in weighty, not thick) for this style, and the wide cowl makes stabilizing the neck impossible. PR reviewers who've made this version have commented that a lightweight, droopy fabric (which mine is) is necessary for this view because a too-stable knit makes the cowl impossibly high and awkward.

I am very sorry I used some of my good fabric for this one. It might be possibly to save it: I'm thinking of, first, cutting the sleeve off to a minimal cap sleeve or, if that doesn't work, removing the sleeves entirely, and maybe taking an inch off each side of the cowl. I think without the sleeves it might be okay. It might even be better than okay. But sleeveless is not what I need to go in my suitcase, so any rescue operations on this one will have to wait until I get back from my trip. Unless a miracle happens and I end up with an hour or two of free time between now and Tuesday morning.
 
The bigger disappointment is that I had the cross-front version of this top (with sleeves added) in mind for another print in this same rayon jersey, and now I don't dare attempt it. I've had this fabric for a couple of years now, and want very much to make something with it, but finding the right pattern remains elusive. I may fall back on my TNT Santa Monica T, but had hoped to find something with a little more styling detail.
 
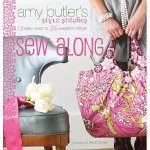
I've also made five (5!) "origami bag" zip pouches from Amy Butler's new book, Style Stitches: 12 Easy Ways to 26 Wonderful Bags
 
This book is GORGEOUS, one of the most beautifully photographed and designed books I've ever oogled over, and worth spending time with for eye candy fun even if you aren't much into bag sewing. The Origami bag is the only pattern from the book I've made so far, and is a nifty little design in six different sizes. I found a few parts of the instructions less than crystal clear the first time through, but having made one the rest were quick and easy. Several of mine are not to Amy's proportions, as I was working with pieces from the "large scraps" quilting drawer and using odds and ends of whatever bag-weight interfacing I could find. They all turned out great, though, and all the little crap I'm taking with me will now be sublimely organized.
 
Pics of these cuties will follow eventually. In the meantime, someone has posted a page-shot of the Origami Bag to Flickr here.