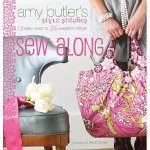
I spent most of yesterday afternoon auditioning fabric for the Cosmo Bag (January's project for the Amy Butler Style Stitches Sew Along). Here's one of Amy's renditions, from the book:
I'm determined to "shop the stash" for as many of these bags as possible, and so far project #1 is already a challenge. The stash yielded three contenders for the exterior print, but finding good lining/trim pairings wasn't easy. In most cases the "best" combination wasn't as spectacular as I was aiming for, or I had a great fabric in insufficient quantity. I considered Kaffe's "Big Blooms" in red, which I have a nice large piece of:
... but decided to save it for the "Miss Maven Ruffled Handbag," coming up as November's project (by which time I am sure to have changed my mind). Instead, for the Cosmo, I'm using two recent purchases from Jane Sassaman's "Hothouse Garden" line for the main exterior and lining pieces, with some Kaffe "chevron stripe" in brown, and my fave green leaves for trims:
As you can see, I do not believe in pressing my fabric before cutting unless it's so horribly crumpled it won't lay flat enough to pin a pattern to. Perhaps some day I'll regret it, but so far this particular lazy habit hasn't tripped me up.
It took me hours to cut all the pieces last night, and almost as long to cut out all the interfacing this morning. This is most, but not all, of it. Still a couple lining pieces to go, but I needed a break.
I love Amy's style, but that woman must carry half her life around with her: her bags are huge. Much bigger than I have any use for. The Cosmo bag might be her largest yet. A full-size Cosmo would make a good beach tote, but I doubt I'd be willing to subject what will be a stunning bag, representing lots of time and effort and fabric investment, to bright sun, salt air/water, sand, and possibly spilled suntan lotion.
So I'm making a smaller one. I cut out all the pattern pieces and reduced them at 78% on our home copier. I measured the tote bag I get the most use from, and based on that probably should have aimed for reducing at 85%, but was not in a mood to figure out how to override the copier presets.
With smaller pieces, I was able to make efficient use of interfacing. The book calls for a whopping 6 yards, but I got all my pieces cut from 2-1/4 yards. I am not going to interface the pocket linings, btw. And I cut the pocket linings from a blue solid... why use the good stuff on the pieces that will be out of sight? I like the side pocket detail where the top of the lining is folded over to make a trim, so have cut separate trim strips for binding the top pocket edges (inside, too).
More details to come as I put the bag together. Most likely I won't tackle that until next weekend. First, I have to go plug in my iron and fuse, fuse, fuse a lot of fabric and interfacing. By the time that's done I won't want to look at this project for several days at least.
Subscribe to:
Post Comments (Atom)


I love your color and print choices! I share your philosophy on only ironing fabric that is so wrinkled the resulting cut piece will be off. Otherwise, i just iron the pieces as I sew them.
ReplyDeleteOnce I start sewing/construction I turn into a pressing demon! I enjoy seeing a wrinkled piece of fabric turn smooth and lovely, and did press all of these before fusing the interfacing (which took FOREVER). I had considered pressing them just for the "here's where I'm going with it" photo... but really, couldn't be bothered. Maybe next time.
ReplyDeleteI like the colors you chose for the bag - very pretty.
ReplyDelete