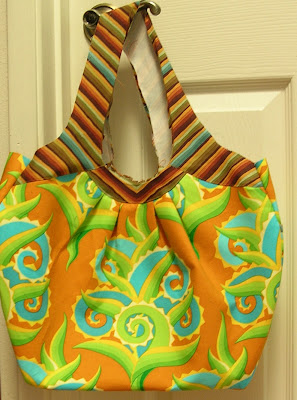
It took a long time to get to completing next steps on my Cosmo Bag for the Amy Butler Style Stitches Sew-Along, although the exterior is now done:
It will look better when I get around to pressing the side seams, which I have not done yet.
First, there was a slight delay while I contemplated the instructions for Step 5 (attach the bands to the main exterior pieces) then walked away.
It's not that piecing two reverse curves together intimidates me. Stay-stitching, clipped or notched seam allowances, getting one concave and one convex curve to make friends: I can do all that. It's Amy's method that seemed all wrong to me. For one thing, why wait until after you've wrestled the two pieces together to notch the seam allowance, when doing that first makes fitting the curves together so much easier (yes, it does mean sewing a line of stay-stitching before the seam, but she has you do that on the handles, so why not here?). And then, "ease the band around the curve on the bag exterior" ... ?!? Um, no, the way to get two curves to play nice is to fit the concave one (the bag exterior) to the convex one (the band) and sew with the convex one on the bottom. Really. It just goes so much more easily that way. Especially when both pieces have a layer of interfacing fused to them, which doesn't exactly help with that "ease" into place requirement.
I considered giving Amy's way a go, just to be fair to the instructions, but I'm not that kind of a seamstress. I came back to it yesterday and did it my way. Which, after a brief moment's thought, involved staystitching along the edge of the band, notching and pressing the seam allowance to the back and then simply top-stitching that piece into place onto the bag exterior. Quick and easy, no wrestling required. Probably not as strong a bond, but that curve isn't going to be taking much of the weight of bag contents anyway, so I don't expect it to be a problem.
Handles and handle inner edge prep were no biggie, so that's all done too, as is assembling the sides to the main body pieces and attaching the bag bottom (although I didn't exactly follow the instructions there, either).
Pic at the top is where I'm at so far: exterior done, waiting for me to get to the lining assembly.
I did add one step that might interest others constructing this ginormous bag. I like the look of the outside pockets, but they are both narrow and very deep, which strikes me as a poor combination. (Keep in mind that I reduced this bag size, so those side pockets are very narrow for my hand. I don't see keeping anything other than maybe a pen in there, and would like to be able to get it out again.)
So, I shortened both the side pockets by aligning the lined pocket pieces over the bag side pieces. Amy has you baste these in place by sewing along the sides and bottom at this stage, which is the kind of extra step I just laugh at. Plus, if you do that, you won't be able to do this:
I flipped just the top layer of the pocket up (to the left, in the pic; you're seeing the white interfacing side folded back), leaving the lining in place, and stitched a line across about 3" up from the bottom. Flip the pocket exterior piece back into place before sewing up those side seams. Now the pocket isn't too deep, and that seam is hidden, rather than having a line of stitching show across the outside of the pocket.
Subscribe to:
Post Comments (Atom)


That fabric is so awesome!
ReplyDeleteI love how you shortened the pocket! I have been googling this bag for the last two hours, deciding if I should make it. I need a bigger bag and I love the shape of this one. Thank you so much for all of your hints and tips. They are so helpful!
ReplyDelete