Wednesday, June 30, 2010

Fun with scraps - Part Three


The Confetti top is done! Size with borders is about 27x37".

I'm a bit disappointed in this photo, which was taken early morning and needed major adjustment to brightness and contrast; the colors are still not right. Took some with the flash, too, but the color in those was so yellow they were useless.

But... I love, love, love how the border turned out! It looks like an ornate picture frame, and I like how it sets off the "modern" randomness and straight lines of the confetti center. I was able to cut between the rows of flowers on the print, and have just enough room on each strip for seam allowance without stitching into any of the major motifs. The binding (when this is backed and quilted) will be the same as the inner border, which is a bit closer to a sage green than it appears here.

This one is now called "Confetti #1", because there will be others. I had a lot of fun playing with this, and my brain is now humming with some variations I'd like to try.

Next time I will set aside at least 12-18" of a background strip to have on hand for making layout adjustments as the interior seams all get sewn together. All those 1/4" seams mean a lot of shrinkage, and some things that looked well apart from each other ended up a bit too close. If I'd had even a short strip of the aqua on hand I could have tweaked things a bit better.

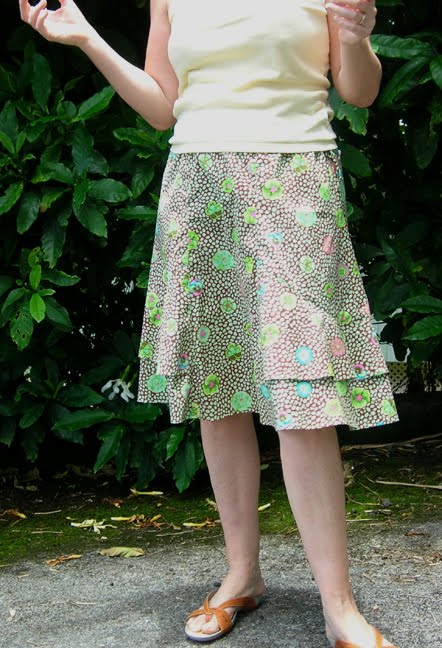
I'm wrestling with what to use for a backing fabric. I do have enough of the border fabric for a back. But I'm feeling greedy and selfish. While I was cutting the border I kept thinking how lovely the print would be as a skirt. A skirt for me, me, me. If I use it to back Confetti #1, will there be enough left to play dress-up with?

Two options: 1) use something else (I have a plan B fabric in mind already); and/or 2) go ahead and make a skirt and then see how much I've got left. I kindof thought I would take a break from making skirts, seeing as how I've got so many of them at this point. But maybe I've got one more to go.

Part of me thinks this print is so awesome as a border fabric that I ought to hoard what I've got for future projects. Whenever I feel the impulse to hoard a fabric I try to take a deep breath and remind myself that the whole purpose behind buying it was to make something out of it, and that there will always be more great fabric available. Always. Any minute now I could fall hopelessly in love with a new print. If when that happens, wouldn't it be nice if I'd made some room for it by using what I've already got?

No hurry, though. I'm not going to quilt this until my 120-day pattern and fabric embargo is over (only 5 weeks to go!) and I've saved up enough for the extension-table-thingie-for-machine-quilting for my Babylock and a couple other small toys on the list.

In the meantime, a horrifying number of "active" projects are lurking in the sewing room, and I ought to put some attention to finishing them before they've sat neglected for long enough to be called UFOs.

Monday, June 28, 2010

Fun with scraps - Part Two: Confetti

I've been at my desk today getting some work done, thinking, "Yesterday was 'rest day' on the workout schedule, so why are my arms and shoulders sore and tight today?" Oh. Right: I spent HOURS yesterday afternoon standing in front of my flannel design wall, moving my arms around and up and down as I tweaked and fiddled and played with these (micro exercise really does add up):

These are my confetti bits: the print pieces are no more than about 2" square, most smaller, each with varying width aqua strips around three sides. There are 4 or 5 that only have aqua around 2 sides, 'cause I ran out. Which means I used up that particular fabric leftover, hooray! (Should have saved a strip for later, more to come on that), but didn't. Here you can see I've slapped them up on the wall in rows by height, which I thought might make the next step easier.

For assembling a layout, I took two pieces of ribbon and pinned them at a right angle on the wall, to keep the work in progress at least close to rectangular. Then I started in the corner fitting confetti bits together, aiming for mid-size composite blocks for easier seaming later:


Having things in rows by height was helpful, as I could quickly find an alternative when the first piece I tried turned out to be too tall or short, or if the height was right but width was all wrong. Of course by the time I was midway through this stage that system had deteriorated, but it was worth doing.

I thought I would peck away at working toward a layout over a couple of days, but I couldn't stay away from it. The challenge of fitting all the pieces together was part of the appeal of this method. It's like a jigsaw puzzle, and I love (love!) jigsaw puzzles! To me, this is creative play-time at it's best, and I can't think of a better way to spend a Sunday afternoon when it's too steamy to play outside.

Here's what I came up with. I've got 4 confetti pieces left over, and that's fine; I'm not going to be obsessive about fitting them all in. The strip of fabric on the right is some of the coordinating Amy B. fabric I've also got leftovers of. Seems like it would make a good border, when I get to that stage:

None of these are sewn together yet, and when they are, all those many many 1/4" seams are going to shrink it down quite a lot. Fingers crossed it will still fit together, roughly, when the composite blocks are sewn up. Then I'll do some trimming and squaring up before finishing the seams. That's what I'll be working on later today; more pics to come when I've got 'em.

Sunday, June 27, 2010

Fun with scraps - Part One

Sewing room tidy-up is coming along nicely, and feels less like drudgery when I take a break from time to time to produce some of these from all those nicely sorted scraps I boasted about in my last post.

Cut pieces are in small project bins near the sewing machine, so I can sew a few more together each time I'm at the machine. Eventually they will add up to quilt tops, most likely for charity donation. Short-term, I just want to use up some scraps!

There are three projects represented here, which is more than I'd intended, but inspiration struck and this is what I'll be working on, in between and around all the summer garment sewing I havent done yet.

First up, HALF-SQUARE TRIANGLES (two ways), inspired by this quilt, although I don't think I'll do the on-point setting. I like the all-prints version for maximum scrap use, and how the 4-patch blocks keep the quilt from being all random.

My squares are 4" for no particular reason. I also love how easy it is to piece these from squares, so there are no cut bias edges to deal with. These are done this way, with two squares each of a lighter and a darker fabric:


I mentioned this HST project to my sister (a more accomplished quilter than I) in an email, and she said have you tried it this way?:


Well that looked like fun, too. Two sizes at once! So I pulled some blue and green solids and more 4" scraps, and started in on those, as well:

Not sure yet how I'll arrange these, but am thinking of a square center of the smaller ones (random assortment), with maybe two rows of the larger ones as a border.  I'm sure to change my mind several times before these make it to the design wall.

Project #3 is the one that has really grabbed me, the CONFETTI quilt, inspired by this one, and following the tutorial here. I could not resist doing something with the pile of teeny scraps I wasn't quite ready to toss. And I have some pale aqua left over from the bedroom curtains that looked like enough for a small (crib size?) something. Here are some in-progress strips, ready to be pressed and cut apart:


More to come on this one, as it is fast, easy, and fun, and I haven't been able to keep my fingers off it today.

Basking in my new (full already!) scrap drawers: many, many, many strips in various lengths, from micro to 2.5" width. Clearly when I get bored with these new project I will have to embark on a string quilt binge. I'm going to try very hard not to start on those until at least one of these is done.

Wish me luck: my track record in the restraint department is not very good.

Friday, June 25, 2010

Inspirational!

I went to WalMart this morning to get a plastic drawer unit for my sewing room, to store sorted (!) quilting  scraps. These look tidy, but will soon be a mess if I keep them in those large bins (which I need for garment fabric anyway; they were a temporary solution):

Free time the past few days (plus a few hours that could have been spent at my desk, producing an income) has gone to folding fabric and tidying up the sewing room. So far I've only done the quilting fabrics. Garment fabric will be tackled this afternoon. And the sewing room isn't much tidier, as I've created quite a mess pulling stuff out so I can see what I've got.

Anyway, a good chunk of the fabric wrangling this week went to sorting through what has become a substantial pile of scraps from both quilt and clothing projects. I realize that serious quilters will laugh themselves silly at what I call a "substantial" scrap accumulation, but it feels like a lot to me. Clearly it is time to make a scrap quilt to use up some of the itty bitty pieces that aren't quite small enough to throw out but are hardest to justify keeping. I'm thinking something like this.

In the meantime, more storage drawers had emerged as an urgent necessity, so off to WalMart I went. That's twice in one month, which is a lot for me, as it is my store of last resort as much as possible. However, it's the only place in town to realiably find something like this at a decent price.

The big thrill came when I wheeled my cart back to the car, and "excuse me!"... a young woman approached. "Can you tell me who makes your skirt," she said. "It looks perfect for summer."

"I designed it myself," I replied, immensely pleased with myself.

"Oh, I thought maybe it was a Lily Pulitzer," she said. "She does such bright florals."

She brightened up when I said I'd made it, so I showed her it was just a simple drawstring a-line, very briefly described my process (I piece the main fabrics before cutting a self-drafted pattern, same front and back), assured her it was something she could do on her very basic sewing machine (straight stitch only), and suggested she Google "self-drafted skirt pattern" when she got home, for pointers.

"Go make yourself a skirt!" I encouraged. "You can do it!"

I hope she does.

* * *

PS: I also stopped at the craft store for some fabric paint, stencil sponges, and spray adhesive, so I can get creative with my old T-shirts, Alabama style. First, though, I need to finish cleaning up the sewing room.

Wednesday, June 23, 2010

Alabama Stitch Book

It may be Day 76 of my 120-day fabric and pattern embargo, which means 44 days still to go, but that doesn't mean I forego all sewing-related treats. My playtime budget allows for the purchase of one sewing book every two months, and this month I indulged in this one, which I have been lusting after for some time:
OMG I love, love, love this stuff. Natalie Chanin is a creative genius. I have spent hours perusing this book (and the flickr group) since it arrived in my mailbox a few days ago. A very different kind of sewing from what I normally do, and something I must try for myself.

I'm thinking of dipping a toe in these waters with something small. Like that ratty old 12x16 pillow on my deck chair. A new cover for that would be a good use for some old Ts from my closet. Like that pink sleeveless one with the lemon juice bleach spots on the front (oops), and the green one soiled by an oily salad dressing spot (darn), and hey, that tissue-weight turquoise top I spilled coffee on (drat). I see great possibilities here.

Or maybe I should put all thoughts of reconstructed jersey sewing aside and make myself a bib.

Monday, June 21, 2010

Hexies in progress

My plan, now that I've got all the GTG flower centers done, was to arrange them on the design wall to ensure a good "random" scattering of blues/reds/others. I don't dare just wing it as I go along, for fear I'll get 2/3 of the way done and realize I've used all the blues and the result will be lopsided, with too many reds in one corner.

I figured I'd draw up a simple grid with row and column numbers on a piece of paper, and pin a post-it position ID# to each one flower. That way I could work in some kind of sequence, get the blues added to several neighboring ones, add the greens, and start assembling larger units in chunks.

Yesterday I tried arranging some GFG flowers on the design wall, and decided that wasn't going to work. I do need to see the flowers with the blue background ring around each one, like this:


So, my grand plan to break up the tedium of sewing all those blues around all those flowers has evaporated. However, I did figure out that the aspect of sewing the blues I didn't like had to do with the assorted fabrics. I'd sew one blue hexie on, then pull another from the basted bag, assess balance, make sure not to have too many of the same in a row, etc. Each new hexie required attention and choices and made the process feel so s-l-o-w. Plus, since I mostly work on this at night during TV hours, the poor lighting made those decisions harder.

On to Plan B: Sunday morning I pulled out a pile of completed flowers and selected blues to go around each one (nice to do with good natural light). Then I picked the blues all up into a neat pile, in order, and secured to the flower with thread.


Now for each flower I have a pile of 12 pre-selected blue hexies ready to go, no decisions required. These will keep me busy for the next few weeks of TV nights:


Then I'll only have to baste a gazillion-trillion more blue hexies, and sew up about 3 more batches of these, to get this lengthy step done.

Sunday, June 20, 2010

SoNP Skirt #4: not quite a wadder

Summer of No Pants skirt #4: technically it is done. Hemmed and zipped and there's even a button and buttonhole in the waistband. But it's so "meh" I can't even be bothered to dig out which pattern I made it from. New Look something that's been around for eons: basic pencil and A-line versions in various lengths. Muslined the pencil version a while back and didn't like enough to make from "real" fabric. This was to see if the A-line is better (no).

The good news: I'm a more experienced seamstress now, and have (maybe) figured out what the problem is: something about this pattern is not right in the hip curve on me. It just doesn't sit well. NL are drafted for a fit model on the short side, and I have to add 2" min. length. But adding it to hem or mid-thigh is not resulting a well-fitting skirt.

I do like this fabric: another Kaffe Fassett from the stash, acquired during one of my many past Fabric.com sale binges. I think I was wrong, though, to assume it would be best as a simple, classic skirt. The only thing appealing (to me) about this is the fabric. As a skirt, it's yawn-inducing.

It needs something more: pockets? rick-rack? pockets trimmed with rick-rack? an eyelet underskirt peeking out the bottom? all of the above?

Maybe, but I'm about 30 years too old to wear the kind of look that would result in. I'll be utterly content if this shrieks "homemade," so maybe I'll get crafty with it, and add some kind of applique. A green vine with big leaves, meandering all the way around, maybe? Finding prints that will stand out against this fabric will be a challenge. Solids might be the answer, but are meager in my stash.

So, not quite a wadder. "Meh," but potentially salvagable if I get creative with it. For now, it's gonna go back in the sewing room closet.

I'm also not happy with the waistband. I made one following the pattern (when was the last time I did that!?) to test my ingrained assumption that I hate waistbands, and yup, it's not my thing. Even in a narrow width and lightweight interfacing it feels stiff and unnecessary. I'm gonna go back to facing or binding my skirt waists, as I like 'em.

Lessons learned:
1) be wary of New Look fit
2) don't use an invisible zip in the side seam (the only stash zip of appropriate length and color on hand); it doesn't hang well
3) I don't like waistbands
4) Plain vanilla clothing is not my thing

Okay, Summer of No Pants challenge has been met. Next up, my own personal challenge: "summer of learning how to sew pants (that fit)." I know, I know: I'm all talk and no action on the pants thing. But I'm going to tackle it before the summer is out. This summer. Really.


Sunday, June 13, 2010

SoNP Skirt #3: Shabby Chic


This (originally plain, and somewhat "meh") pink skirt is flattering and comfortable, and delightfully fluttery about the ankles in action, and I hardly ever wear it. That's because I bought two, and when deciding which to wear I reach, over and over, for the green one. For the Summer of No Pants week 3 project I decided to embellish this one with some simple machine applique and turn it from a forgotten garment in the back of the closet into something I will wear.

I got the idea to use on-point squares from the Sideways Squares Skirt in this book. The plan was to use many different fabrics from the scrap bin, but over and over when I lay them on the skirt they didn't feel just right. Until I grabbed a half-yard piece of this Amy Butler print:
... and it clicked. The effect is much more subtle than I'd planned ("subtle" not being a word that is used often in describing my color preferences), and I love it.

The skirt is a long A-line with large and rather oddly shaped godets in each side seam which result in a bit of a handkerchief hem look. You can see the shape and my embellishment layout a little better here (this color is closer to accurate, but harder to see):

I cut fabric squares in several sizes: 5, 4, 3, and 2". Largest are at the bottom, and the smallest rest between the lower two rows. At first I'd planned to fold under the edges of each square, but after pressing a few that seemed laborious. Plus, the skirt fabric (a linen-cotton blend) is very floppy drapey, so unhemmed squares seemed like a better choice.  I trimmed each square with pinking shears, pinned them in place, and sewed them down with a zigzag stitch. After washing, they should get nice and fuzzy around the edges. I figure a good "shabby chic" effect will mean I never have to iron this skirt again.

Here's another look at the result:
This was so easy and fun and quick to do. I may have to rummage in the closet for more clothes to embellish.

Saturday, June 12, 2010

KF Diamonds: borders added

The quilt center is all sewn together, and today I added the inner border and chose the outer border fabric. Here it is up on the design wall: the blue outer border is still in raw pieces.

This isn't what I had planned. First off, I was going to use the darker chevron stripe (more red/brown than pink) for the inner border. Turns out this one works better, and is possibly not quite as obnoxious as I'd feared it would be.

For the outer border I was going to use Dancing Leaves in orange or Big Blooms in red, mostly because I have adequate yardage of those two. But my finished border size will be only 4: Big Blooms was just too BIG (blooms would not show at their best, so why bother). Dancing Leaves has a very strong repeat element and I would have had to waste a huge amount of (pricey! Kaffe Fassett!) fabric to cut the borders from similar enough parts of the print that they wouldn't look all lopsided. Oh well. Probably I'll use that fabric for the binding when I get to that stage.

So I grabbed my stack of Kaffe quilt books (eye candy! inspiration!), retreated to a lounge chair out on the deck, and leafed through them, looking at border treatments and hoping the perfect solution would either appear or bubble up. I briefly considered piecing a border from alternating red and blue prints in 4" squares (a size my dwindling stash could handle), but at this point anything other than minimal piecing seems like too much work. So I had the idea to do "random" strips of a few close, medium-tone, medium-size prints in blues. This neatly solved the problem of how to make a border from what's left in the KF bin without having to piece more than a little bit.

Back in the sewing room I pulled out these three... Clouds, Lake Blossom, and Asian Flowers (not sure those are the exact names) because they combine the blue and pink colors prominent in the center. The asian flowers is on a dark brown ground, but it goes well enough. I cut 5" strips of each fabric, then cut them down to random generous but not too long lengths, and slapped 'em up.

Voila! Perfect! I didn't even have to tweak it!!! Someone slipped something good into my creative juice today. I look forward to sewing this up, but might take a day or so to just leave it up as is and admire it, and think how clever I am to have come up with this solution... plus, I have some other stuff I need to do.

BTW: I took a whole bunch more photos, including some closeups, and this is the ONLY one that was in focus. This is a frequent, recurring problem. Perhaps I should invest in a tripod??


Friday, June 11, 2010

Kaffe Fasset Diamonds in progress

This is what 's been up on my design wall the past few weeks. It's a modification of a pattern from the new Kaffe Fassett book, and will be "side B" of the Pink Lattice lap quilt. Here I've stitched the framing strips around each diamond, but the blocks are not sewn together yet. Colors are a bit darker than shown.

I scaled the pattern down to better fit the lap quilt dimensions, which, with a 4-5" border all round, will end up at about 48x72. My diamonds are 6"x12". Most are fussy cut to highlight favorite floral bits of various fabrics (all but one are KF or KF Collective). My frame strips are were cut at 1.25" (.75" finished width) because I had some KFC "jelly roll" strips to use, and by splitting each 2.5" strip lengthwise I had enough to use each print twice.

I matched centers to frames as I cut, making sure that no combination was repeated. Not the best approach, but this is a 100% stash project. I had very limited quantities of some fabrics, which resulted in cutting more diamonds than ideal from the prints I had more of. I knew from the get-go that following Kaffe's alternating light-dark plan was not going to be possible, but I figured the fabrics are all so gorgeous that whatever I managed to pull off would still look pretty good.

My original plan was to alternate rows of (mostly) "red" and "blue" diamonds, but when I laid them out that way the frames did not play together well. So I gave up and just fiddled (and fiddled, and fiddled some more) over four or five days, taking another peek each time I walked past the sewing room, until I felt it was as good as it was going to ever be. The biggest challenge was keeping the several bold chevron stripe frames from ending up next to each other, cause as soon as they ganged up they stole the show.

The side and end half-diamonds are from complete ones sliced in half... which means each is short the seam allowance along the cut side, and I'm having to stretch those blocks to fit as I do the assembly. So far that hasn't caused any horrific problems, and since the frames are from jelly roll strips they are cut across the fabric width and are quite stretchy. Again, not the best approach: the result of combining stash limitations with a slapdash attitude to this particular project.

Ah well, I've never claimed to be a perfectionist, and this quilt's for me, me, me, and I'll love it anyway. I've been stitching the blocks together a few at a time since last week, and have only a few long seams to go. This one, like the "NTG" quilt I'm making for Mr. de Hilo, is going to be put away until I get the extension table thingie for my machine so I can machine-quilt them.

Monday, June 7, 2010

my sewing room needs one

The most brilliant idea of the week month year: I must make one of these for my sewing room.
(Thanks to "HowAboutOrange" for the link.)

I've been scribbling "next steps to complete X project" lists on scraps of paper and then wonder were I put them. On the wall, duh, where I can see them.

I'll need to test some fabrics (my stash is thin in the "light" color ranges) to find one that won't make whatever notes I write difficult to read.

Now, where did I stash those old poster frames? Fingers crossed my dry-erase markers will both write on and wipe off of aging plexiglass...

Sunday, June 6, 2010

SoNP Skirt #2

Got another one done:
Fabric is Kaffe Fassett "Guinea Flower" that's been in the stash since I succumbed to impulse during a Fabric.com sale some time ago. I had in mind a summer dress, but the rows of flowers have a stronger linear/diagonal impact than I'd thought. Pondering how to cut a princess-seamed top from this for TNT Vogue 8232, and how to avoid having any of those little blossoms end up in an infortunate spot either above or below the waist, I gave up and set the fabric aside.

Eventually, as it so often does, my mind turned to thoughts of a skirt. And it kept imagining this fabric as a pretty summer skirt. Something slightly girly. With a flounce perhaps.

Something like New Look 6682, which I've commented on here and here. "I doubt I'll ever make it again," I'd said, documenting the pattern's flaws. Hah. As soon as I thought "skirt" for this fabric, I thought of this pattern. Shorter. Much shorter. And with the double flounce. This fabric wants to be flounced.

So I dug out the pattern, took a whopping 7" of length out of each skirt piece (which I'd lengthened 2" for version 1), and, after much fiddling, figured out how to squeeze all the necessary pieces for View D from my 2.5 yards of fabric: doable, but a tight fit. I also decided I would work with the excessive ease, rather than try to remove it, and make this up as a drawstring waist (whee! no zipper!). I left about 2.5" of the top left side seam open, folded down another 1-3/8" at the waist to make a drawstrong casing, bringing the length, as planned, to the bottom of my kneecap.
This could turn out to be a fave summer skirt. I love the length, and the pale green, pink, and turquoise flowers will go with many different tops. (Ignore, please, the ratty old camisole I've mostly cropped out of these pics; it's what I had on, and as good anything else that's clean today). Too bad so many of my sleevless T's are showing their age. I'd like to make a top to go with this, maybe something in eyelet? I have a couple of patterns that might work, but no appropriate fabric, and the embargo isn't over for another two months.

Much as I love sewing, it's handy to have a bunch of cheap sleeveless T's in the closet, and I could use some fresh ones. I'll go shopping this week and see if I can find one or two that will go with this skirt.

Wednesday, June 2, 2010

Kyoto Skirt (muslin) photos


Yeah, took a while to get these taken. Here it is all, in all its a-size-too-small glory. I don't normally go around in skin-tight anything, but wanted a short-ish top for the photos, and this one was handy. I figured I'm documenting how I look in a skirt that's tighter than I'd wear in public, why not continue that theme on the top half?

Not a bad looking skirt, from this angle. I might even wear it, if I can shrink down enough to eliminate the slight pulling across the hips.

This back view's okay, too, considering.

I'm liking the pockets today. All these pastel florals are a bit frou-frou for me, but I might actually wear this some day. If it weren't for this view:

I don't know if this is just too much godet for my booty, or if it's purely a size issue, or if it's just starting at the worst place on my butt.

It didn't occur to me until I saw this shot that godet placement might be a problem. Ordinarily I add at least 1" to any skirt, often 2", as I'm 2"-4" taller than patterns are designed for. But this one I left alone, because out of the envelope it's exactly the length I was going for (the front hits just at mid-knee, which is shorter than as shown in the illustrations and HotPatterns videos). On the other hand, I'm wearing this about an inch below my "natural waist" since that's where I like my skirts to sit. So you'd think those two factors would cancel each other out.

I do still want to make this from a solid, lightweight twill, with all the bias trim and top-stitching. But I think I'll put this pattern on back burner for a bit. Going up a size is easy enough, but I don't like all of those folds of fabric bursting out of my butt, and will need to mull over what to do about that.

SoNP Skirt #1

Skirt #1 for the "Summer of No Pants" challenge (a skirt a week for 4 weeks). Given the current fabric embargo in force here, I'll be making all my 4 from stash.

This is last week's skirt, and I did get it done on time (finished Sat. am), really. It's the pics part that slows me down. Even with a flash it was tough to get these to come out. I need to find a better photo location somewhere around here, but that's a task for another day.

As you can see, this is another pieced, slapdash, summer skirt made up of various quilting cottons; TNT self-drafted pattern; comfy drawstring waist. Here's the back:

Skirt #2 is on track for completion by the end of the week, but no promises about when I'll have a photo of it!