Showing posts with label Kaffe Fassett fabric. Show all posts

Tuesday, March 8, 2011

Block-a-Palooza Block 13 (twice)

Block 13 (from Camp Follower) is a nice one, with tons of potential for color play. Which is kind of funny, because the original is so pale and subtle (qualities rarely used to describe my fabric choices).

I started with this one...
... because I've been wanting to use the red (in the corners) and brown colorways of "Asian Circles" together in something, and the turquoise and orange are so nice together I wanted to use them again, too. I like the detail of the floating nine-patch in the center, but that teeny little 1/8" border around it was something of a pain to produce. I said I wasn't going to do that again.

But I did. This morning I finally emailed all our tax info (there's a lot of it: we own two home-based businesses) off to our accountant, and rewarded myself with some time in the sewing room, producing this version:
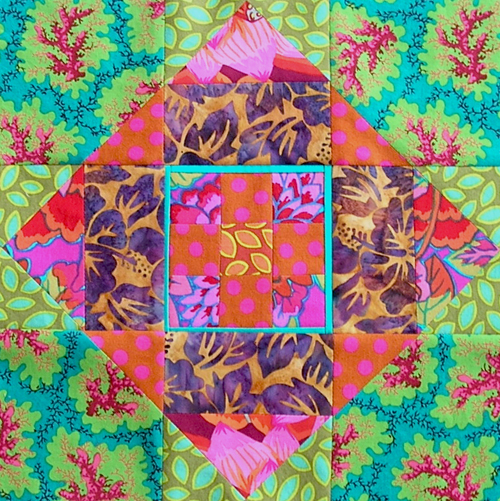
I like this one even better. My original thought was to make a smaller nine-patch and frame it with a 1/4" border, but once I got going I figured "1/4", 1/8" might as well do the skinny one as the other." That purple and brown batik is a hibiscus print and one of my favorite fabrics. It sneaks into a lot of things I make. And I've been itching to use that Phillip Jacobs "coral" print in good-sized pieces somewhere. Here it is even better in the corners than I'd hoped.

Did you notice that little snippet of red leafy print in the very center? Yup, it's the other colorway of that "little green leafy" I've been including in each block. I've had the red on reserve for use in sashing/setting in some way when all the blocks are done, but couldn't resist sneaking a tidbit in here.

There are several 'palooza blocks that I like so much I want to make an entire quilt out of them. This is one of them. The temptation to exclude these blocks (and a few others) from the 'palooza quilt (whatever that turns out to be) so I can do something else with them is a strong one.

Friday, March 4, 2011

Block-a-Palooza Block 12, mostly

I made Block 12 twice, because it's nice. As usual, I did not exactly follow the original design (sorry, Jennifer, don't take it personally, it's just how I am.)
For this one, instead of using two geese back-to-back in the center position of each side, I cut large squares from a bold Kaffe Fassett print and set them on point. I also rotated the corner geese squares so they are flying in from the edges. That lovely tonal red/orange print, BTW, is from a piece that has been in my stash since before I moved to Hawaii (in 1999). I am very, very choosy about where I use it (it began as a half-yard, and there is so little left!), and it is just right here.

I had a little bit of a bright green print loitering on the sewing table, left over from piecing a back for the monochrome project. It wanted to romp with Kaffe's "henna" in "duck egg", which has been in the "potential future block use" pile for some time:
I made on-point squares again, and paired them with teal/red/orange. This time I used the back-to-back geese idea from the original layout, and put them in the corners. The four-patch center is from the pile of extra 2.5" bits in the 'palooza fabric bin.

Although I couldn't resist cutting large squares to feature a couple of the many lovely fabrics that want a chance to shine in this project, I also really like the paired goose squares in close tones/values. This block is going to stay up on my design wall for a bit, as I think about what else I might make with back-to-back geese like this.

Today it's back to OBW borders (just as soon as I get enough desk stuff done to earn sewing time). I am very eager to get that top done so I can start quilting. Not that I've figured out how to quilt it yet. I'm weighing options. The monochrome top and back are ready to go, but I have no batting on hand (that stash went into the lap quilts project), so it's on hold until I get to my local quilt shop for supplies.

Tuesday, February 22, 2011

Block-a-palooza Block 9

Block 9, from Scott at Blue Nickel Studios, is called "Lemonade Stand" and it's a doozy. I cringed when I saw those tiny geese in the center, but it's worth playing with the teeny pieces:
Rummaging around in the scrap piles (my large scraps used to be in a bin, but are now in heaps all over my sewing room; these blocks keep coming before I can clean up), I found a piece of Heather Bailey print perfect for fussy cutting corners. Once I committed to that, throwing the other HB candy-colored prints in the mix was a must.

The geese got into quite a state at all the excitement and insisted on fleeing the scene, so they are facing out, rather than swirling around the center. I don't blame them. I'm calling this one "explosion at the candy factory."

My inner four-year-old loves these prints, but they are so young and sugary sweet they've never fit in well with the rest of my stash. This block was fun to throw together, but it's making my teeth ache. If I'm going to go over-the-top/off-the-deep-end (as has been known to happen) I prefer a more grown-up goofiness.

Like this:

This is the "by the rules one," planned around using the last of an old Kaffe Fassett charm pack for those corner squares. I'd already trimmed these long ago to 4" for something they never got used for (don't remember what), so reducing them to 3.5 didn't seem like a big deal. I hadn't used the dots in a few blocks, and they were feeling neglected, so they got to join in the fun, too.

I wish now that I'd squared up the 9-patch center unit before adding the sides, as it is clearly not square, but I was tired and hungry and impatient and just wanted to get it done. No chance I'll go back and redo it, so I'm crossing my fingers it will look fine once quilted.

BTW: I made all the geese for these two blocks the "wasteful" way: sewing a diagonal across 1.5" squares on top of a 1.5"x2" rectangle and trimming the extra. Which is way too tiny to make HSTs from, and a few square inches of fabric, total, so hardly a big waste. No way I was going to follow the instructions, which assumed a higher tolerance for lining up and sewing (accurately! without stretching!) little bias edges than I will ever have. The squares were so small I didn't even bother penciling in the seam lines, just eye-balled it.

Monday, January 31, 2011

Block-a-Palooza Block #3 is a winner!

Oh, man, I love how this turned out so much I want to make a whole quilt out of it.
Too bad I'm working from stash, as I don't have much left of the chartreuse solid, and only enough of the stripe for a couple, maybe three, more geese blocks for the 'palooza thing.

On the plus side, I recently got more of the Kaffe Fassett "persimmons" print in the center (2 whole yards, squeeeee! although a day will come when I'll wish I'd bought six) because I was down to about a fat eighth and the idea of running out of it entirely was unbearable.

I'm going to have to make at least one more of this block. No way am I done playing with it. Won't be able to sew them up right away, though, as I'm taking my machine in for servicing in about half an hour. Hope they can turn it around fast.

Thanks, Sasikirana Homemade, for this lovely block layout!

Thursday, December 9, 2010

Amy B. Origami Bags - Set 2

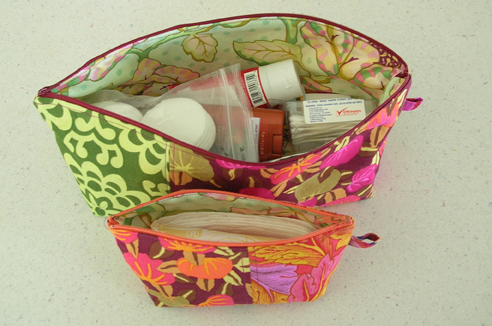
Here are the other two Origami Bags I made from (from Amy B's new bag book):

The larger one is 14" across the top, the smaller one 7". That's the last small bit of the orange leaf print, which I wish I had more of. Both these bags feature my fave "Persimmons" by Kaffe Fassett. I have very, very little of this left so was thrilled to find it on sale at Fabric.com, and could not resist ordering 2 yards to replenish the stash.  Even though I am not supposed to be doing ANY stash-building until substantial yardage is used up.

My questionable logic is that, technically, "virtual Santa" bought it to go under the tree, but still. More fabric. 2011 will be all about stash busting, because I am close to the point of having no room for more yardage (not to mention a drained hobby budget!).

The larger bag is Amy's proportions. It holds all kinds of bathroom stuff, and got use again last weekend on an overnight getaway to Kona. Amazing how a couple hours in the car and a night at a resort feels like getting away for days. Hoping for more frequent short getaways next year.

The front one is taller than Amy makes 'em, accomplished by taking a very shallow corner seam. It is perfectly sized for those "feminine necessities" we sometimes need to have at hand. Both these have that lovely Heather Bailey print inside. I was so happy to find a good use for that print. It's lovely, but a little too pretty/girly for other purposes I'd considered. It's perfect to line these bags.

I look forward trying out more patterns from Amy's book, after I get some more XMas sewing done.

Wednesday, December 8, 2010

Amy B. Origami Bags - Set 1

So, I'm really slow getting these pics up. Here, at last, are the first of the Origami Bags (from Amy B's new bag book) I made for corralling travel stuff. I strayed from Amy's exact sizing on some of these, as I was using whatever caught my eye from the scrap drawer, and with whatever odds and ends of mid-weight fusible interfacing I could find.

This is the smallest one. If I'd blogged this closer to sewing day I would remember more precisely how it might vary from the littlest Origami pattern in the book, other than it's made from just one piece of fabric on each side, rather than having pieced sides like all the others. 
I also made it a bit longer than the pattern, partly because I only had a narrow piece of this fabric, and also to fit the intentended contents, which were my pink iPod Nano and my ancient cell phone + earpiece, as you see here. This one came along in my purse. That's a Kaffe Fasset print on the outside, Heather Baily on the inside.


These two are a bit larger. The green one in front was the first I made, so it's the most accurate rendition of Amy's sizing and proportions. That came in my purse, too, as it held the requisite 1qt. zip-lock baggie of hand sanitizer etc. Sure, I coulda just stuck the plastic baggie in my purse, but who doesn't like pretty fabric better than plastic?


This whole project started when I made the green one, thinking it would be handy to corrall all the powercords and rechargers I was taking with me. But, duh, I didn't pay enough attention to the photos and diagrams in the book when I selected what size to make, because these bags are all about 2" longer at the zipper than they are at the base. So when I got the first one done, and went to fill it up, it turned out to be just a little bit small for the purpose.

So I made another: the pink and orange one in the back. It's about 12" long and intentionally wider/flatter than Amy's design (accomplished by taking a deeper cross-seam when forming the corners of the base). From a purely design standpoint, the proportions of this one are not as pleasing, but it's the perfect size for everything I wanted to stash in it: chargers and power cords for the camera battery, the iPod, the cell phone, and my Kindle. It holds a lot of cords. This one went into my suitcase, and I was very pleased with it.
These were so quick and fun, I made two more. Which I either never took or have lost the photos of. I'll remedy that shortly. They are just like these three, only slightly different.

If you are looking for an excellent last-minute homesewn gift idea, I highly recommend one or more Origami bags. BTW: the book calls for making these from home dec weight fabric, but as you can see, quilting weight works just fine, too. And don't worry about having exactly the interfacing called for. I used probably three different kinds and weights in my not-matching set, with no problem at all.

I would have made some of these for XMas gifts, but I used up all but tiny scraps of my mid-weight interfacting stash on the ones for myself, and haven't managed to restock yet. Maybe next year.

Monday, August 16, 2010

Stash Confessional

Oh, I was doing SO well until this morning. I'd actually used more fabric (45 yds) than purchased (42.5 yds) so far this year, but I just tipped that equation the other way via Fabric.com. In my defense, the bulk of my purchase was lining yardage in 3 colors, which I need for some garment fabric that, if not lined, will never see wear. That's not to say that I'll sew it up anytime soon, but it had been on my "grab some when it's on sale" list for a while.

The purely indulgent purchase of the day was these two prints. The first is one of my all-time fave Kaffe Fassett prints, in a new-to-me colorway, "Persimmons" in Opal:


I got three yards of this, which is how much I need to make a maxi-dress like this one for around the house wear. It's not the most flattering dress ever, but OMG, so comfy. I've been wearing the butterfly version almost daily and thinking, every time I zip it up, "it sure would be nice to make another of these, next time I find a great cotton print on sale." I've been keeping my eye out for something, and this is it. Came out to around $4.50/yard, which is a good price for KF. I don't think I'll get to sewing it up before my Oct. trip, though, so into the stash it will go.

The other indulgence was this ridiculous Brandon Mably (Kaffe Fassett Collective) print, "Fish Lips," in Lilac, which I have been giggling at for the past year or so:


I don't know why I love it so much, but it makes me smile every time I see it, which is a good thing. I only got two yards because this one wasn't on sale, so it won't be a maxi-dress (probably just as well; that would be a little too goofy, even for me). I envision it as a wide quilt border for... something. I can't pretend this one is anything other than stash accumulation.

While in confessional mode, I'll cop to some more pattern accumulation, too. This is entire the Vogue site's fault, as they put all their patterns on sale today. I got these:

V1177, Anna Sui dress. Reality check: on me this will be a tunic. I have some cotton lawn in the stash in mind for this one, if/when I get to it.


V8323, knit tops, also on my "grab when it goes on sale" list. I have in mind the brown stretch jersey I recently aquired, for the cross-neck view, plus sleeves.

And V1051, the very popular Alice+Olivia pants:

I know, I know, I haven't even produced one successful pants muslin yet. But I've had good luck with that kind of shaped yoke on a skirt, so hope it might be a nice feature on my figure... although it's way too low as drafted. And I'll probably cut it wide-legged all the way down, rather than nipping in at the knee. I may be delusional, but have high hopes for final results from this, tempered by expectation that it may become a year-long project to get them right. I think I even have some appropriate fabric in the stash for this, if I don't use it for something ese, first.

Anyhoo, one of the perks drawbacks of being self-employed is that no one but me every reader of this blog knows that I've now spent half the morning on stash accumulation, instead of on income-generation, which is what I really should be focusing on, given that it's now 10:25 on Monday morning...


Sunday, June 20, 2010

SoNP Skirt #4: not quite a wadder

Summer of No Pants skirt #4: technically it is done. Hemmed and zipped and there's even a button and buttonhole in the waistband. But it's so "meh" I can't even be bothered to dig out which pattern I made it from. New Look something that's been around for eons: basic pencil and A-line versions in various lengths. Muslined the pencil version a while back and didn't like enough to make from "real" fabric. This was to see if the A-line is better (no).

The good news: I'm a more experienced seamstress now, and have (maybe) figured out what the problem is: something about this pattern is not right in the hip curve on me. It just doesn't sit well. NL are drafted for a fit model on the short side, and I have to add 2" min. length. But adding it to hem or mid-thigh is not resulting a well-fitting skirt.

I do like this fabric: another Kaffe Fassett from the stash, acquired during one of my many past Fabric.com sale binges. I think I was wrong, though, to assume it would be best as a simple, classic skirt. The only thing appealing (to me) about this is the fabric. As a skirt, it's yawn-inducing.

It needs something more: pockets? rick-rack? pockets trimmed with rick-rack? an eyelet underskirt peeking out the bottom? all of the above?

Maybe, but I'm about 30 years too old to wear the kind of look that would result in. I'll be utterly content if this shrieks "homemade," so maybe I'll get crafty with it, and add some kind of applique. A green vine with big leaves, meandering all the way around, maybe? Finding prints that will stand out against this fabric will be a challenge. Solids might be the answer, but are meager in my stash.

So, not quite a wadder. "Meh," but potentially salvagable if I get creative with it. For now, it's gonna go back in the sewing room closet.

I'm also not happy with the waistband. I made one following the pattern (when was the last time I did that!?) to test my ingrained assumption that I hate waistbands, and yup, it's not my thing. Even in a narrow width and lightweight interfacing it feels stiff and unnecessary. I'm gonna go back to facing or binding my skirt waists, as I like 'em.

Lessons learned:
1) be wary of New Look fit
2) don't use an invisible zip in the side seam (the only stash zip of appropriate length and color on hand); it doesn't hang well
3) I don't like waistbands
4) Plain vanilla clothing is not my thing

Okay, Summer of No Pants challenge has been met. Next up, my own personal challenge: "summer of learning how to sew pants (that fit)." I know, I know: I'm all talk and no action on the pants thing. But I'm going to tackle it before the summer is out. This summer. Really.


Saturday, June 12, 2010

KF Diamonds: borders added

The quilt center is all sewn together, and today I added the inner border and chose the outer border fabric. Here it is up on the design wall: the blue outer border is still in raw pieces.

This isn't what I had planned. First off, I was going to use the darker chevron stripe (more red/brown than pink) for the inner border. Turns out this one works better, and is possibly not quite as obnoxious as I'd feared it would be.

For the outer border I was going to use Dancing Leaves in orange or Big Blooms in red, mostly because I have adequate yardage of those two. But my finished border size will be only 4: Big Blooms was just too BIG (blooms would not show at their best, so why bother). Dancing Leaves has a very strong repeat element and I would have had to waste a huge amount of (pricey! Kaffe Fassett!) fabric to cut the borders from similar enough parts of the print that they wouldn't look all lopsided. Oh well. Probably I'll use that fabric for the binding when I get to that stage.

So I grabbed my stack of Kaffe quilt books (eye candy! inspiration!), retreated to a lounge chair out on the deck, and leafed through them, looking at border treatments and hoping the perfect solution would either appear or bubble up. I briefly considered piecing a border from alternating red and blue prints in 4" squares (a size my dwindling stash could handle), but at this point anything other than minimal piecing seems like too much work. So I had the idea to do "random" strips of a few close, medium-tone, medium-size prints in blues. This neatly solved the problem of how to make a border from what's left in the KF bin without having to piece more than a little bit.

Back in the sewing room I pulled out these three... Clouds, Lake Blossom, and Asian Flowers (not sure those are the exact names) because they combine the blue and pink colors prominent in the center. The asian flowers is on a dark brown ground, but it goes well enough. I cut 5" strips of each fabric, then cut them down to random generous but not too long lengths, and slapped 'em up.

Voila! Perfect! I didn't even have to tweak it!!! Someone slipped something good into my creative juice today. I look forward to sewing this up, but might take a day or so to just leave it up as is and admire it, and think how clever I am to have come up with this solution... plus, I have some other stuff I need to do.

BTW: I took a whole bunch more photos, including some closeups, and this is the ONLY one that was in focus. This is a frequent, recurring problem. Perhaps I should invest in a tripod??


Friday, June 11, 2010

Kaffe Fasset Diamonds in progress

This is what 's been up on my design wall the past few weeks. It's a modification of a pattern from the new Kaffe Fassett book, and will be "side B" of the Pink Lattice lap quilt. Here I've stitched the framing strips around each diamond, but the blocks are not sewn together yet. Colors are a bit darker than shown.

I scaled the pattern down to better fit the lap quilt dimensions, which, with a 4-5" border all round, will end up at about 48x72. My diamonds are 6"x12". Most are fussy cut to highlight favorite floral bits of various fabrics (all but one are KF or KF Collective). My frame strips are were cut at 1.25" (.75" finished width) because I had some KFC "jelly roll" strips to use, and by splitting each 2.5" strip lengthwise I had enough to use each print twice.

I matched centers to frames as I cut, making sure that no combination was repeated. Not the best approach, but this is a 100% stash project. I had very limited quantities of some fabrics, which resulted in cutting more diamonds than ideal from the prints I had more of. I knew from the get-go that following Kaffe's alternating light-dark plan was not going to be possible, but I figured the fabrics are all so gorgeous that whatever I managed to pull off would still look pretty good.

My original plan was to alternate rows of (mostly) "red" and "blue" diamonds, but when I laid them out that way the frames did not play together well. So I gave up and just fiddled (and fiddled, and fiddled some more) over four or five days, taking another peek each time I walked past the sewing room, until I felt it was as good as it was going to ever be. The biggest challenge was keeping the several bold chevron stripe frames from ending up next to each other, cause as soon as they ganged up they stole the show.

The side and end half-diamonds are from complete ones sliced in half... which means each is short the seam allowance along the cut side, and I'm having to stretch those blocks to fit as I do the assembly. So far that hasn't caused any horrific problems, and since the frames are from jelly roll strips they are cut across the fabric width and are quite stretchy. Again, not the best approach: the result of combining stash limitations with a slapdash attitude to this particular project.

Ah well, I've never claimed to be a perfectionist, and this quilt's for me, me, me, and I'll love it anyway. I've been stitching the blocks together a few at a time since last week, and have only a few long seams to go. This one, like the "NTG" quilt I'm making for Mr. de Hilo, is going to be put away until I get the extension table thingie for my machine so I can machine-quilt them.

Sunday, June 6, 2010

SoNP Skirt #2

Got another one done:
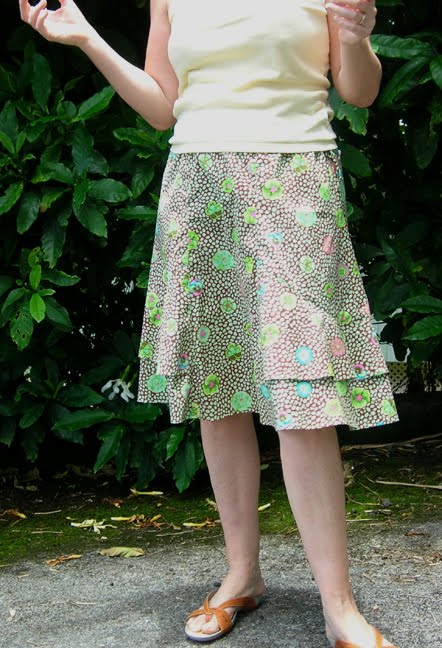
Fabric is Kaffe Fassett "Guinea Flower" that's been in the stash since I succumbed to impulse during a Fabric.com sale some time ago. I had in mind a summer dress, but the rows of flowers have a stronger linear/diagonal impact than I'd thought. Pondering how to cut a princess-seamed top from this for TNT Vogue 8232, and how to avoid having any of those little blossoms end up in an infortunate spot either above or below the waist, I gave up and set the fabric aside.

Eventually, as it so often does, my mind turned to thoughts of a skirt. And it kept imagining this fabric as a pretty summer skirt. Something slightly girly. With a flounce perhaps.

Something like New Look 6682, which I've commented on here and here. "I doubt I'll ever make it again," I'd said, documenting the pattern's flaws. Hah. As soon as I thought "skirt" for this fabric, I thought of this pattern. Shorter. Much shorter. And with the double flounce. This fabric wants to be flounced.

So I dug out the pattern, took a whopping 7" of length out of each skirt piece (which I'd lengthened 2" for version 1), and, after much fiddling, figured out how to squeeze all the necessary pieces for View D from my 2.5 yards of fabric: doable, but a tight fit. I also decided I would work with the excessive ease, rather than try to remove it, and make this up as a drawstring waist (whee! no zipper!). I left about 2.5" of the top left side seam open, folded down another 1-3/8" at the waist to make a drawstrong casing, bringing the length, as planned, to the bottom of my kneecap.
This could turn out to be a fave summer skirt. I love the length, and the pale green, pink, and turquoise flowers will go with many different tops. (Ignore, please, the ratty old camisole I've mostly cropped out of these pics; it's what I had on, and as good anything else that's clean today). Too bad so many of my sleevless T's are showing their age. I'd like to make a top to go with this, maybe something in eyelet? I have a couple of patterns that might work, but no appropriate fabric, and the embargo isn't over for another two months.

Much as I love sewing, it's handy to have a bunch of cheap sleeveless T's in the closet, and I could use some fresh ones. I'll go shopping this week and see if I can find one or two that will go with this skirt.

Wednesday, June 2, 2010

SoNP Skirt #1

Skirt #1 for the "Summer of No Pants" challenge (a skirt a week for 4 weeks). Given the current fabric embargo in force here, I'll be making all my 4 from stash.

This is last week's skirt, and I did get it done on time (finished Sat. am), really. It's the pics part that slows me down. Even with a flash it was tough to get these to come out. I need to find a better photo location somewhere around here, but that's a task for another day.

As you can see, this is another pieced, slapdash, summer skirt made up of various quilting cottons; TNT self-drafted pattern; comfy drawstring waist. Here's the back:

Skirt #2 is on track for completion by the end of the week, but no promises about when I'll have a photo of it!

Thursday, May 27, 2010

Kaffe Fassett hexie flowers


I used to think I watch way too much TV, but now that I have become addicted to paper-pieced hexagons (the perfect hand-sewing project for couch potato time) there's no such thing as too much. Shown here: the product of the past couple of months.

The "petals" are all Kaffe Fassett fabrics, centers are mostly from the scrap bin. As you can see, each flower will also receive a ring of assorted watery batik blues. Once that's done, some bits of leafy greens will connect them all together.

In addition to TV time, I've also discovered that sewing up a flower or two first thing in the morning is calm and meditative, and a lovely way to start the day. And slightly more productive than reading or just staring into space for half an hour, which is what I used to do while caffeinating.

I'm proceeding at a much faster rate than expected, now that I'm keeping my fingers busy during formerly lazy time. Nevertheless, there's a long, long way to go before completion.

Sunday, May 23, 2010

Kyoto Skirt preview


The Kyoto "muslin" is done. Here's a preview (it's midday, but dark and rainy at the moment, not good for anything but a quickie on-the-hanger snapshot. I'll model it for you as soon as conditions improve and I can corral Mr. de H. into photog duty.)

As you can see, my fabric choices started out a bit silly, and got worse, which is what happens when you decide to make a muslin from all the stuff in your stash you aren't likely to ever use for anything else.

I didn't bother with elastic at the waist, just made some ties. I forgot to leave the little tie openings in the side seams when I sewed them up, so figured, "it's a muslin, what the h*ll, I'll just put the openings in the facing and put that on the outside" -- which is a design option, not just me losing my mind.

Once I'd done that, I figured I might as well put the hem facing on the outside, too. It's a bit much. I kinda like it ("a bit much" is not necessarily a bad thing in my world), but can't decide if the overall effect is waaaaaaaay too young for me, or overly grandmotherly, or somehow both.

I almost left the pockets off, but I'd already made them (double-layer, with the polka dots on the inside), so slapped 'em on, and discovered that patch pockets alone made the whole thing look too much like an apron, so I added the polka-dot pocket flaps, too.

You can see the godet in back hangs lower than the front, which I gotta say is one of my fave features of this skirt. Booty issues mean that a "straight" hem ends up not straight at all on me, unless I make adjustments. With this skirt, all that is a non-issue.

I was a bit optimistic when choosing to muslin a size 12, which is snug around the belly and hip area. But you know what? It's a bit less snug than when I first did up the main seams a couple weeks ago. Another month or two of workouts with Tony *, and it might even be wearable. 

* Totally not my idea, but hubbie's into it, so I've been doing it too. Even at my wimpy pace it's having a nice effect.

Sunday, April 25, 2010

Kyoto Skirt Muslin

My Kyoto Skirt pattern has finally arrived, and I'm ready to jump in.

Almost. I've decided to "muslin" before cutting into the fabric I have in mind. Don't really want to, but gut says I should.


Do you ever feel like you've got an imp on one shoulder whispering: "You don't need to make a muslin! It will be fine. Cut the good stuff already and let's get sewing!" And on the other shoulder is your guardian sewing angel, trying to get your attention: "Don't listen to her! You'll be sorry if you don't make a muslin first."

Sometimes I listen to the imp, some days I heed the angel. I've decided to heed the angel this time because this is my first Hot Patterns pattern, and I don't know how that line will fit. Going by the HP size chart, length should be okay, but my waist and hip measurements are smack dab in the middle between a 12 and a 14. So which is the best choice? Since this is not a tightly fitted garment, I'm going to try the 12, because who doesn't want to sew the smaller size? Based on flat measures of the pattern I should end up with 4" of ease in the hip, which isn't huge, but ought to be enough. We'll find out.

First up, what to muslin from? As you can see from the photo above, I've gone a little goofy with it. The main fabric is the Kaffe Fassett "anemone" in pink/purple that I decided not to use for my hexies quilt project. A bit of an odd choice for this pattern, more so if I make patch pockets from a piece of uber-girly Heather Bailey print from the stash. And why not throw some polka dots in there, while we're at it? (I had the insane impulse, just for a moment, to make the godet from the Heather Bailey print, too, but even at my goofiest I don't need to walk around with an explosion of flowers coming out of my butt.)

My inner 4-year old is going to love this skirt. Assuming it turns out wearable. I might even go totally wild and make the bellows pockets and flaps. Just for the hell of it. Since this supposed to be a quickie muslin I'm skipping the piping and top-stitching, and won't bother with interfacing all the curved edges (isn't that what stay-stitching is for?), although I'll edge-stitch the yoke curves and godet seam for stability.

If this one lives up to expectation, I'll go ahead and cut into the dark olive twill I've been seeking a purpose for. That one will be a more sedate version.

Friday, April 16, 2010

Another just-for-fun skirt

You'd think, having completed the Pattern Review Mini-Wardobe Challenge, that I'd have had enough of sewing for a while. Yet I felt this odd compulsion yesterday evening to sit down and make another skirt.

But not just any skirt. This one had to be a goofy, slap-dash, just for fun skirt. An anti-challenge skirt. A skirt that might get posted online, but which is not part of a wardrobe or in the running for any prize other than, just possibly, even 'though it's only April, my most favorite thing I make this year.

I used my TNT self-drafted, drawstring Fat Quarter Skirt pattern, based on the Sew What, Skirts! method, and went to town with some large scraps from the quilting stash:
* big bold flowers: Anna Maria Horner
* pink on white bird-in-a-tree: Jennifer Paganelli
* blue floral hem: Kaffe Fassett

Total sewing time: about 2 hours, including cutting fabric and making the drawstring. I eyeballed the blue border piece, with the help of a ruler, rather than cut a new pattern piece for it. Pins employed during the entire process: 0.

The hem is faced with a bias strip, with a length of lime green rick-rack sandwiched in the seam, because I found it in my "trims" drawer and it was just the right length. Don't you just love using something up?

The back is similar to the front, but with a narrower piece of the pink-on-white, and more of the bold floral.

I'm itching to wear this, but eeesh, It's COLD here: overcast with intermittent rain and temps barely into the low 70s, if that. (Our daytime high on Wed. was only 69! laugh if you want, but that's chilly for Hawaii.) So, I'm huddled in yoga pants and a velour pullever, with fuzzy slippers on my feet, waiting for the sun to come out and warm me up.


Saturday, March 27, 2010

Patricia Tunic #1

Finally, one garment done for the Pattern Review Mini-Wardrobe Challenge. Which means I'm behind schedule, but I'm probably delusional to think I have any chance of finishing four garments in a month. It's nice to have gotten something done, even if garments 4,3, and/or 2 don't happen on time.

That pink spot at the neck is a fake tag made from a random print from the scrap bin, because it's fun and bit silly, both of which are good things in my world:


Pattern is the "Patricia Tunic":

Thanks to Angie for bringing this one to my attention not long ago!

I made the same option as shown on the pattern cover, with long, contrast-faced, bell sleeves and contrast facing at the neck. I've been wanting to make a tunic for some time, and the princess seaming on the front of this pattern appealed to me, along with the design possibilities implied by the sleeve and neckline facings. Here's a line drawing I extracted from the PDF file:

As you can see, I took some liberties with the facing line. This pattern overal seems to be designed with ease of use for a beginning sewist in mind, hence the nothing-challenging neckline facing line. There are a number of "I made this!" photos online which encouraged me to go with this pattern, but I gotta say the facing looks too bib-like in many renditions. So I redrew it with some nice curves.

I like Jennifer's fabrics but my main purpose for making a tunic (any tunic) was to use the blouse-weight turquoise linen that's been in my stash for several years now. It was one of the first fabics I purchased when I decided to try sewing my own clothes, and I still hadn't done anything with it.

Funny how I didn't remember, until I was cutting the fabric out, that I've never sewn linen before. Fortunately, although tricky to cut perfectly (it's lightweight, and a bit wriggly to handle; a good candidate for rotary cutting, but I don't have a large enough matt for that), it is a dream to sew.

The contrast facings are a Kaffe Fassett print. You can't imagine (or maybe you can) how many fabrics I've pulled from the stash as I pondered, repeatedly, over many months, what would go best with this linen. I'd have gone with this one from the get-go, and saved myself a lot of pondering time, if I'd realized I had enough of it. I thought I had only the one scrap, which was plenty for the sleeve facings and back neck, but not the front. Serendipity came to the rescue: while I was looking for something else I came across a second largish scrap, just enough for the front facing! Yay!  (Erm, yes, my stash is a little untidy. I'll tidy it up one of these days months years.)

I called this post "Patricia Tunic #1" because I'm quite sure I'll make it again. I have some cotton lawn to use up, and more Kaffe Fassett prints.

But first I need to do some more sewing on this mini-challenge (it would be nice to get at least two garments done), and write up a review of this pattern, which is mostly good but man, have I got one HUGE (or very small) peeve to snipe about...

Thursday, March 25, 2010

obsessed


They warned me. "It's addictive," they said, and "I can't seem to stop," but did I listen?

It's all American Idol's fault. And Biggest Loser. And our DVR. There's just sooo much TV to sit through on a Tuesday night, so I was poking around the sewing bloggiverse last week looking for some kind of hand-sewing project to work on while in couch-potato mode. Preferably one that would use up some if not most of the Kaffe Fassett prints in my overflowing "charms and strips" drawer. I didn't have anything specific in mind, other than no way was I ever going to make a cathedral window anything ever again. One pillow cover was enough of that for me, thank you.

So I poked around and came across a blog mention (and then another, and another) of English Paper Piecing, specifically hexagons, and specifically the "Grandmother's Flower Garden" layout, and it was exactly what I was looking for. I have fond memories of napping (decades ago, in another century, when I was a child) under a very traditional genuine-from-the-1930s GFG quilt actually made by my Great-Grandmother (surely, musthavebeen, 'cause no way did Grammy every sit down and hand sew a quilt!), which is still somewhere in my Mom's house, though now in tatters.

So I printed up some sheets of 3/4" hexies and cut them out and started turning scrap fabric into smaller scraps and basted away and then made some flowers. And a bunch of green hexies that will be leaves. The pic above is most of what I've produced since last weekend, when the obsession began. I don't know yet for sure what these will become, or whether I'll use that pink "Anemone" KF print as the background or not, but I'm very sure I'm officially hooked on making these little cuties during TV time. It's the perfect lap project, and I just can't seem to stop.

BTW: I'm also close to finishing my first garment for the Mini-Wardrobe challenge, so hope to have  a pic and post on that by the weekend.

Tuesday, September 8, 2009

12 yards later...

The muslin for Vogue 8232 is almost perfect. Ripped out the center front bodice piece, recut a new one to adjust shoulders and neckline, and sewed that back in, tried on again, took in a bit either side of the center back seam at the top, and voila, fitting #3 looks probably as good as anything I sew myself is going to get.

The dress, if knee-length, requires a bit more than two yards, and for the maxi closer to three. I don't have anything that size in my stash except for:
A) some lightweight linen and cotton lawn, both of which are too thin (I have in mind tunic-type tops for those, but haven't gotten to them yet).
B) a piece of quilting cotton that is perhaps the worst color for me to wear. Not gonna make clothes from it, ever.

I have some lovely extra fabric from my office curtains project (still in progress), and could cut the skirt from that if I make the bodice from something else. I do have coordinates available, but until the office curtains are done I don't want to cut into the excess. Just in case I make some horrible error while sewing (or spill coffee on one, or whatever) and need to redo one.

How convenient that Fabric.com sent me an email this morning about another 50% off sale. Here’s what I got:


Kaffe Fassett in brown/pale green. I have a charm square of this, and although it's not the colors I usually gravitate toward, I think the colors and scale will be a good match for the Vogue dress.


Goofy blue and pink butterflies. I may pull this from the package and go, "OMG, what was I thinking?!" I was thinking it's 50% off, and could make a fun ATH (around-the-house) dress. I have a fairly high goof-tolerance, but if this is more than I can bring myself to wear -- even on sillier-mood days -- it might end up on the back of the pink lattice quilt.


Two autumnal orange scrolly prints. They might combine into a dress, but I suspect the smaller print will turn out to be metallic. In which case these two might become the new placemats/napkins I've been thinking of making. And maybe a "Birdie Sling" if I ever get around to using my pattern for that. Or a mandarin style jacket?


Another KF. I have a lot of charm/strip bits of blue and white, to which scraps of whatever I make from this will be added. I'm thinking a short dress will appeal on those days I feel like dressing a little more "ladylike" than usual. Or it might become something for my mum, who loves anything ladylike and blue.

So, 12 yards later, and I have fabric for at least one dress, maybe several. Stay tuned...

Tuesday, August 4, 2009

Tactical error and a new rule

The new rule is "never buy anything smaller than a fat quarter!"

I'm liking this, because it provides a built-in reason to buy more (i.e., FQs) rather than less (charms, layer cakes, jelly rolls) fabric. But there's a very practical reason behind it.

The tactical error I made was to purchase several "jelly roll" selections of Kaffe Fassett prints, because I wanted to broaden the range of fabrics to include in a future project, but a little bit of most would be plenty. I'm going to finally follow through on my goal to learn foundation piecing this year, and figured the 2.5" strips would be a perfect size for the pattern(s) I have in mind.

So far, so good, but it was not until I received the "your order has shipped" emails that I realized my error: I'm a dedicated pre-washer, and if I were going to mix the new bits in with existing fabric stash (which is a given), I'd have to pre-wash the jelly rolls, too. I love love love KF fabric, but dang, the stuff does shrink. Mixing unwashed with prewashed KF does not strike me as a good idea. Especially because I will be using a lot of his very intense colorways in deep reds and blues and purples.

I have to say I was tempted to ignore the strident yelps of reason from the logical side of my brain, but in the end I gave in. The pic above shows what about half a jelly roll looks like when it comes out of the wash. I did put it in a net bag, and grabbed it out of the dryer while still quite damp (ironing with a hot but no-steam iron dried it out fine), but still... what a mess.

The strips sure are gorgeous, though, and worth the hassle (although I don't plan to go through it again, it's FQs or bigger for me from now on). They aren't quite the pre-cut 2.5" width any more, but I'm not planning to use any of them for the kind of pattern other folks use jelly rolls for, so not an issue for me.

Here's today's pick of three I wish I had larger pieces of. There are many others, but today I especially like these. The red "big blooms" to the right I do have a large piece of. It's one of several reds that will feature prominently in a very ambitious (for me) project I have planned. More on that later.