Both our "deck" quilts (lap quilts, for lounging on our deck chairs on cool afternoons) are done! I test drove mine yesterday, and both Cosmo and I are very pleased with it. Both quilts are about 44"x72", a size I decided on based on best dimensions of the various beach towels we've been napping under on the deck up' til now.
I am still looking for the optimum quilt-photo location around our house. It's tricky. I like the idea of outdoors, for days when light cooperates. But our lot is extremely steep.Nice views from up here, but it's practically vertical. We have plenty of deck and railing to hold a quilt over, but in most places I'd need to rent a cherry picker to get up level with it for a photo.
The side of the house is better than the front, heightwise, so I strung a piece of clothesline between two railing supports, clipped the top of the quilt to it while crouched on the deck, then smooshed the quilt through beneath the railing, then scurried down the stairs on the other side of the house, back and around, and up the side slope to get a photo. Repeat as necessary until all sides are done. Cosmo thought this was a fascinating process. Here's the back of the Pink Lattice Quilt, with cat supervision from above:
And this is the finished "Nothing Too Girly" quilt made for Mr. de Hilo. It has two fronts, rather than a front and a back. I did the blue-green squares side first. Photo colors are brighter than actual, but you get the idea:
I did not have a back planned out for this one. While pondering options and rummaging in the far acres of the stash, I came across a large ziplock baggie of long-abandoned, half-finished, monkey wrench blocks that I had forgotten about. A little quick punching at the calculator, and I figured out that not only did I have enough extra of the orange and purple fabrics to use as borders for the front, but also that using all the mostly done blocks would fit this one as a back and qualify as finishing an embarrasingly old UFO.
Mr. de Hilo has tried it out both ways up, but has not expressed a "front" or "back" preference yet.
Using these monkey wrench blocks makes this side a winner in "most satisfying sewing project of the year" category. And the Pink Lattice "front" I'm going to call my "favorite" item made this year, even though all of the front except the outer border was made in 2009.
Both of these are (I think) worth a closer look, but I have not yet taken detail shots of the quilting, so you'll have to wait for those.
It's been immensely satisfying to get these projects to the point where I could machine quilt them, which counts as using a new toy: the extension table thingie for my machine was a much-anticipated purchase for the year.
I had fun doing the quilting, and look forward to finishing up more in-progress quilts this coming year. Hopefully by the time the next ones are done I will have found a better photo location. The back wall of the carport has possibilities... and it would be nice to have an indoor option as well.
I only wish, as I was spending so much money on fabric in 2010, that I'd remembered to save a little for a camera tripod, so I could start taking decent pictures of the finished products. I'm going to make that some kind of incentive/reward for fabric purchase restraint in 2011.
Showing posts with label handmade gifts. Show all posts
Thursday, December 30, 2010
Monday, December 27, 2010
Post-Christmas Show and Tell
So, the big day has come and gone and secret projects are no longer secret. Here's the pillow I made for my Mom, to go with the Cathedral Windows one from a year or so ago:
Recognize it? These are the sample One Block Wonder hexagons I made earlier this year, after seeing what Shelley was up to. They lingered on my design wall for months before I decided to go ahead and do a pillow front and back with them. I filled in the outer bits with blue solid.
All those bias edges looked like a hot mess by the time I was done piecing...
but a brutal pressing worked wonders. I quilted each side with some poly batting that was lying around, with cotton lawn for "backing" to reduce weight.
This was my first-ever free motion quilting, and I had a blast zipping around more or less highlighting various shapes in the hexagons. Objectively, I did a really a horrible quilting job: sloppy and imprecise with wildly varying stitch lengths and all kinds of "ooops, didn't mean to do that" moments. Fortunately, Mom is as forgiving of my adult efforts as she was with kindergarten art projects, and I had no illusions going in that I would be capable of anything other than an exuberant slapdash job, so we're both happy with it.
My first one was a bit of a dud, due to user unfamiliarity with my new 1/4" foot and how it would behave, but the rest were easy-peasy. Next time I might get really lazy and machine stitch the binding.
Here's the set of six. As you can see they are a mix-n-match set from prints that play well together:
The "back" wraps around to the "front" (or could be the other way around) to make the binding, which is a nice touch when using two different fabrics for each.
Mr. de Hilo's lap quilt is done and has been put to use. I haven't figured out yet where in (or outside) this house to set up for a quilt pic, but hope to get one soon. My lap quilt is almost done. There's a bit more quilting still to do on it, and then binding. My goal is to get it done before NYear, and I might even beat that by a few days if all goes well.
BTW: Santa outdid herself this year in the gift fabric department! I'll show off some of those new goodies in a next post.
Recognize it? These are the sample One Block Wonder hexagons I made earlier this year, after seeing what Shelley was up to. They lingered on my design wall for months before I decided to go ahead and do a pillow front and back with them. I filled in the outer bits with blue solid.
All those bias edges looked like a hot mess by the time I was done piecing...
but a brutal pressing worked wonders. I quilted each side with some poly batting that was lying around, with cotton lawn for "backing" to reduce weight.
This was my first-ever free motion quilting, and I had a blast zipping around more or less highlighting various shapes in the hexagons. Objectively, I did a really a horrible quilting job: sloppy and imprecise with wildly varying stitch lengths and all kinds of "ooops, didn't mean to do that" moments. Fortunately, Mom is as forgiving of my adult efforts as she was with kindergarten art projects, and I had no illusions going in that I would be capable of anything other than an exuberant slapdash job, so we're both happy with it.
The piping, alas, did not turn out well. I do think it makes a nice defining line between front and back, but it's why the edge is so ripply. I've decided to think it looks sort of flower-shaped, and to not worry about it.
My sister got a couple of the prettiest coffee mugs (she's happened to mention needing new ones) with matching coasters I made following this tutorial:
My first one was a bit of a dud, due to user unfamiliarity with my new 1/4" foot and how it would behave, but the rest were easy-peasy. Next time I might get really lazy and machine stitch the binding.
Here's the set of six. As you can see they are a mix-n-match set from prints that play well together:
The "back" wraps around to the "front" (or could be the other way around) to make the binding, which is a nice touch when using two different fabrics for each.
Mr. de Hilo's lap quilt is done and has been put to use. I haven't figured out yet where in (or outside) this house to set up for a quilt pic, but hope to get one soon. My lap quilt is almost done. There's a bit more quilting still to do on it, and then binding. My goal is to get it done before NYear, and I might even beat that by a few days if all goes well.
BTW: Santa outdid herself this year in the gift fabric department! I'll show off some of those new goodies in a next post.
Sunday, December 19, 2010
The 8-lb Christmas Ornament
... and why we don't have any lights or other ornaments up on our tree yet:
So far, he's only tipped it over once, and he climbed right back in as soon as I'd set it upright. We're waiting to see if the thrill wears off. It's an artificial tree, and a bit ratty; I'm half hoping he does enough damage I'll have a reason to junk it come 12/31.
Cosmo has also been helping out in the sewing room. I'm trying to finish up a lap quilt for Mr. de Hilo to use when we lounge on the deck on chilly winter afternoons (when the temperature might plunge toward 70... brrrrr!). It's already a big hit with the cat, who naps on it every chance he gets. When he's not napping, or out chasing birds and geckos, he tries to remove the safety pins with his teeth:
This my first free-motion quilting project, and I'm having fun. My FM stitching is about as bad as it gets, but that's okay, so long as I feel I'm getting better by the time this is done. Mr. de Hilo is unlikely to notice, or to care if he does, that the quilting is a long way from gorgeous. He'll just be touched that I made something for him, for a change, after sewing so many things for myself.
When this one's done, I do also have a deck quilt for myself to finish up. Chances that will happen before Christmas morning are looking slim, but it might get done.
Hope all your Santa projects are coming along... only a week left for elfin sewing!
So far, he's only tipped it over once, and he climbed right back in as soon as I'd set it upright. We're waiting to see if the thrill wears off. It's an artificial tree, and a bit ratty; I'm half hoping he does enough damage I'll have a reason to junk it come 12/31.
Cosmo has also been helping out in the sewing room. I'm trying to finish up a lap quilt for Mr. de Hilo to use when we lounge on the deck on chilly winter afternoons (when the temperature might plunge toward 70... brrrrr!). It's already a big hit with the cat, who naps on it every chance he gets. When he's not napping, or out chasing birds and geckos, he tries to remove the safety pins with his teeth:
This my first free-motion quilting project, and I'm having fun. My FM stitching is about as bad as it gets, but that's okay, so long as I feel I'm getting better by the time this is done. Mr. de Hilo is unlikely to notice, or to care if he does, that the quilting is a long way from gorgeous. He'll just be touched that I made something for him, for a change, after sewing so many things for myself.
When this one's done, I do also have a deck quilt for myself to finish up. Chances that will happen before Christmas morning are looking slim, but it might get done.
Hope all your Santa projects are coming along... only a week left for elfin sewing!
Labels:
distractions,
handmade gifts,
home decor,
NTG quilt,
quilts,
stash projects
Thursday, December 9, 2010
Amy B. Origami Bags - Set 2
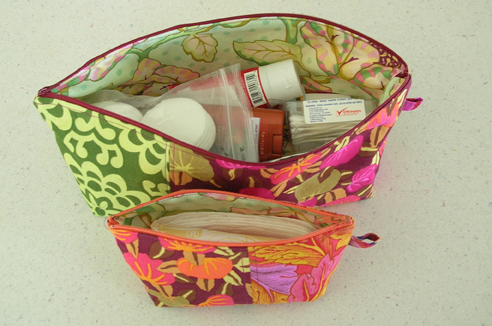
Here are the other two Origami Bags I made from (from Amy B's new bag book):
The front one is taller than Amy makes 'em, accomplished by taking a very shallow corner seam. It is perfectly sized for those "feminine necessities" we sometimes need to have at hand. Both these have that lovely Heather Bailey print inside. I was so happy to find a good use for that print. It's lovely, but a little too pretty/girly for other purposes I'd considered. It's perfect to line these bags.
I look forward trying out more patterns from Amy's book, after I get some more XMas sewing done.
The larger one is 14" across the top, the smaller one 7". That's the last small bit of the orange leaf print, which I wish I had more of. Both these bags feature my fave "Persimmons" by Kaffe Fassett. I have very, very little of this left so was thrilled to find it on sale at Fabric.com, and could not resist ordering 2 yards to replenish the stash. Even though I am not supposed to be doing ANY stash-building until substantial yardage is used up.
My questionable logic is that, technically, "virtual Santa" bought it to go under the tree, but still. More fabric. 2011 will be all about stash busting, because I am close to the point of having no room for more yardage (not to mention a drained hobby budget!).
The larger bag is Amy's proportions. It holds all kinds of bathroom stuff, and got use again last weekend on an overnight getaway to Kona. Amazing how a couple hours in the car and a night at a resort feels like getting away for days. Hoping for more frequent short getaways next year.
The front one is taller than Amy makes 'em, accomplished by taking a very shallow corner seam. It is perfectly sized for those "feminine necessities" we sometimes need to have at hand. Both these have that lovely Heather Bailey print inside. I was so happy to find a good use for that print. It's lovely, but a little too pretty/girly for other purposes I'd considered. It's perfect to line these bags.
I look forward trying out more patterns from Amy's book, after I get some more XMas sewing done.
Wednesday, December 8, 2010
Amy B. Origami Bags - Set 1
So, I'm really slow getting these pics up. Here, at last, are the first of the Origami Bags (from Amy B's new bag book) I made for corralling travel stuff. I strayed from Amy's exact sizing on some of these, as I was using whatever caught my eye from the scrap drawer, and with whatever odds and ends of mid-weight fusible interfacing I could find.
If you are looking for an excellent last-minute homesewn gift idea, I highly recommend one or more Origami bags. BTW: the book calls for making these from home dec weight fabric, but as you can see, quilting weight works just fine, too. And don't worry about having exactly the interfacing called for. I used probably three different kinds and weights in my not-matching set, with no problem at all.
I would have made some of these for XMas gifts, but I used up all but tiny scraps of my mid-weight interfacting stash on the ones for myself, and haven't managed to restock yet. Maybe next year.
This is the smallest one. If I'd blogged this closer to sewing day I would remember more precisely how it might vary from the littlest Origami pattern in the book, other than it's made from just one piece of fabric on each side, rather than having pieced sides like all the others.
I also made it a bit longer than the pattern, partly because I only had a narrow piece of this fabric, and also to fit the intentended contents, which were my pink iPod Nano and my ancient cell phone + earpiece, as you see here. This one came along in my purse. That's a Kaffe Fasset print on the outside, Heather Baily on the inside.These two are a bit larger. The green one in front was the first I made, so it's the most accurate rendition of Amy's sizing and proportions. That came in my purse, too, as it held the requisite 1qt. zip-lock baggie of hand sanitizer etc. Sure, I coulda just stuck the plastic baggie in my purse, but who doesn't like pretty fabric better than plastic?
This whole project started when I made the green one, thinking it would be handy to corrall all the powercords and rechargers I was taking with me. But, duh, I didn't pay enough attention to the photos and diagrams in the book when I selected what size to make, because these bags are all about 2" longer at the zipper than they are at the base. So when I got the first one done, and went to fill it up, it turned out to be just a little bit small for the purpose.
So I made another: the pink and orange one in the back. It's about 12" long and intentionally wider/flatter than Amy's design (accomplished by taking a deeper cross-seam when forming the corners of the base). From a purely design standpoint, the proportions of this one are not as pleasing, but it's the perfect size for everything I wanted to stash in it: chargers and power cords for the camera battery, the iPod, the cell phone, and my Kindle. It holds a lot of cords. This one went into my suitcase, and I was very pleased with it.
These were so quick and fun, I made two more. Which I either never took or have lost the photos of. I'll remedy that shortly. They are just like these three, only slightly different. If you are looking for an excellent last-minute homesewn gift idea, I highly recommend one or more Origami bags. BTW: the book calls for making these from home dec weight fabric, but as you can see, quilting weight works just fine, too. And don't worry about having exactly the interfacing called for. I used probably three different kinds and weights in my not-matching set, with no problem at all.
I would have made some of these for XMas gifts, but I used up all but tiny scraps of my mid-weight interfacting stash on the ones for myself, and haven't managed to restock yet. Maybe next year.
Monday, December 28, 2009
Handbags for Christmas
I almost forgot to post a follow-up to the sneak peek of bags I made for my mom and sisters this year. Here they are:
A "taxi tote" (Anna Maria Horner pattern from her "Seams to Me" book) made from blue Kaffe Fasset fabric strips, seamed to together, lined with an Amy B. pastel print. I made the bag about an inch wider than the original pattern, but taking a larger seam at the bottom corners, and added a double-layer of very stiff interfacing (no idea what, it's been in the stash a while) between the bag and lining. Mum had admired the Taxi Tote I'd made for myself when she was last here for a visit, and hinted that she might like something similar. Hard to believe it's been over a year since I made the first one, which has turned out to be a favorite, and much-used everyday bag. I like it so much, I might need to make another.
Two "birdie slings" (Amy Butler pattern), the green one is an AMH print, with KF trim. The blue-brown is batiks from my stash that I think play especially well together.
I reduced the (huge!) pattern pieces at 78% on my home copier to make a more everyday size. I added some length back to the strap, since that got reduced, too, along with the bag body and lining, and I didn't want the straps to be too short.
I'm going to make one of these for myself someday, too.
A "taxi tote" (Anna Maria Horner pattern from her "Seams to Me" book) made from blue Kaffe Fasset fabric strips, seamed to together, lined with an Amy B. pastel print. I made the bag about an inch wider than the original pattern, but taking a larger seam at the bottom corners, and added a double-layer of very stiff interfacing (no idea what, it's been in the stash a while) between the bag and lining. Mum had admired the Taxi Tote I'd made for myself when she was last here for a visit, and hinted that she might like something similar. Hard to believe it's been over a year since I made the first one, which has turned out to be a favorite, and much-used everyday bag. I like it so much, I might need to make another.
Two "birdie slings" (Amy Butler pattern), the green one is an AMH print, with KF trim. The blue-brown is batiks from my stash that I think play especially well together.
I reduced the (huge!) pattern pieces at 78% on my home copier to make a more everyday size. I added some length back to the strap, since that got reduced, too, along with the bag body and lining, and I didn't want the straps to be too short.
I'm going to make one of these for myself someday, too.
Labels:
Birdie Sling,
handbags,
handmade gifts,
Taxi Tote
Saturday, December 12, 2009
Christmas Sneak Peek
It's not that I haven't been sewing much this past month (although I have not sewn a stitch in over a week, too many other things going on at the moment), but that the things I've sewn have been wrapped up and shipped out to be opened by others on XMas morning. So I don't want to describe what I've been up to in more detail than that, or make photos available, just in case a recipient is checking in here. But I couldn't resist putting up a sneak peek. The mishmash above is just that: small details cropped from several different gifts, and all cuddled together as one image. The different bits aren't even to scale. Some Anna Maria Horner, up there, and a bunch of Kaffe Fassett blues, and some batiks from the stash that to my eye play very well together. Further details will have to wait until after the holidays.
Monday, September 14, 2009
Cathedral Windows Pillow
Mum loved her birthday present, and now that she's opened the package I can finally post photos of the Cathedral Windows pillow I made for her. Here's the front:

And the back:

The prints are all Amy Butler fabrics. I tried, but failed, to tweak the colors in these photos for greater accuracy. The pale blue is not quite so neon-bright as it appears, and the dark taupe is softer.
Finished size is 18" square, and there's a zip under the right side of the dark taupe strip on the back. I'd show you a close-up, but then you'd see how messy some of my hand-stitching is.
Here's my advice to anyone tempted to try this pattern/method: If you Google "Cathedral Windows tutorial" you will come across some variations in construction. One major difference is whether to simply press in the raw edge on the large foundation block or to sew them up. I fell for the "fold instead of seam" approach (it seemed so much easier) and I can saw with some expertise now that it does not produce as good a result.
It may seem like so much more work to do the tedious seaming and turning and pressing first step on the large square (setting up to fold the corners in a second time to make the "window" frames), but it is worth it.
I had fun making this, as I've wanted to try my hand at Cathedral Windows for a long time, and was curious how it would work with a limited color palette and repeated fabrics, rather than the more traditional "charm" approach using as many different fabrics as possible. It was a good "lap project" to have on hand for TV nights.
I can't remember exactly what size foundation squares I started with (9"?) before all that seaming and folding. If I ever make something like this again, I think I'll start a little smaller (8?), so the windows/charms are smaller as well.
But that's not likely to ever happen. Getting this done really stretched the outer limits of my patience and attention span for doing something so tedious and repetitive. Before pillow, my attitude toward Cathedral Windows was "that's so interesting and different; I'd like to tray making something with that method some day." After pillow, it's: "been there, done that." I still like this pattern/method, but will be happy from now on to admire the efforts of others. How anyone makes it through enough of these fussy little squares to get an entire bed-quilt out of it is a mystery to me.
Speaking of quilts, I started on the lap quilt I'm making for my husband. Will post more about that some day when I've reached a photo-op point.

And the back:

The prints are all Amy Butler fabrics. I tried, but failed, to tweak the colors in these photos for greater accuracy. The pale blue is not quite so neon-bright as it appears, and the dark taupe is softer.
Finished size is 18" square, and there's a zip under the right side of the dark taupe strip on the back. I'd show you a close-up, but then you'd see how messy some of my hand-stitching is.
Here's my advice to anyone tempted to try this pattern/method: If you Google "Cathedral Windows tutorial" you will come across some variations in construction. One major difference is whether to simply press in the raw edge on the large foundation block or to sew them up. I fell for the "fold instead of seam" approach (it seemed so much easier) and I can saw with some expertise now that it does not produce as good a result.
It may seem like so much more work to do the tedious seaming and turning and pressing first step on the large square (setting up to fold the corners in a second time to make the "window" frames), but it is worth it.
I had fun making this, as I've wanted to try my hand at Cathedral Windows for a long time, and was curious how it would work with a limited color palette and repeated fabrics, rather than the more traditional "charm" approach using as many different fabrics as possible. It was a good "lap project" to have on hand for TV nights.
I can't remember exactly what size foundation squares I started with (9"?) before all that seaming and folding. If I ever make something like this again, I think I'll start a little smaller (8?), so the windows/charms are smaller as well.
But that's not likely to ever happen. Getting this done really stretched the outer limits of my patience and attention span for doing something so tedious and repetitive. Before pillow, my attitude toward Cathedral Windows was "that's so interesting and different; I'd like to tray making something with that method some day." After pillow, it's: "been there, done that." I still like this pattern/method, but will be happy from now on to admire the efforts of others. How anyone makes it through enough of these fussy little squares to get an entire bed-quilt out of it is a mystery to me.
Speaking of quilts, I started on the lap quilt I'm making for my husband. Will post more about that some day when I've reached a photo-op point.
Saturday, August 1, 2009
Do I dare...
... post a photo of a gift for my mom here?
I don't think she reads this blog, but maybe she takes a peek from time to time. You'd think my own mom would be a "follower" but I doubt she knows what following is, or how to do it (she only recently got her own email account, a big step for someone of a generation for whom all things digital can be intimidating).
Mum's turning 75 in September, which seemed worth making a bit of a fuss about, although she says she'd rather ignore birthdays at her age. So, way back last winter I got started on a gift for her, something mostly hand-sewn that I could work on in the evening while watching TV.
I am totally patting myself on the back for starting it so early, because it's the kind of thing I'd work on for a few days, then drop for a couple of weeks. Progress was slow, but it only took me seven months (I'd allowed eight) to finish what for some might have been at most a week or two project.
Anyway, it's finally done, and turned out gorgeous, and I soooooo want to put up a photo and show it off.
But I don't want to be a spoiler, so I'm gonna hold off for a bit longer. I'll provide a teaser, though, by saying that the finished product falls into the "home decor" arena, and by showing you a fabric sample to illustrate the prints/color scheme:

Mum loves softer blues and demure florals, and I'm an Amy Butler addict, so these are a happy compromise: the colors are "Mum," and while the prints are bolder than she'd choose for herself they make the gift look like something made by me.
I'm going to go take a photo of the finished ... thing ... right now, so I can really show it off here after the big day.
I don't think she reads this blog, but maybe she takes a peek from time to time. You'd think my own mom would be a "follower" but I doubt she knows what following is, or how to do it (she only recently got her own email account, a big step for someone of a generation for whom all things digital can be intimidating).
Mum's turning 75 in September, which seemed worth making a bit of a fuss about, although she says she'd rather ignore birthdays at her age. So, way back last winter I got started on a gift for her, something mostly hand-sewn that I could work on in the evening while watching TV.
I am totally patting myself on the back for starting it so early, because it's the kind of thing I'd work on for a few days, then drop for a couple of weeks. Progress was slow, but it only took me seven months (I'd allowed eight) to finish what for some might have been at most a week or two project.
Anyway, it's finally done, and turned out gorgeous, and I soooooo want to put up a photo and show it off.
But I don't want to be a spoiler, so I'm gonna hold off for a bit longer. I'll provide a teaser, though, by saying that the finished product falls into the "home decor" arena, and by showing you a fabric sample to illustrate the prints/color scheme:

Mum loves softer blues and demure florals, and I'm an Amy Butler addict, so these are a happy compromise: the colors are "Mum," and while the prints are bolder than she'd choose for herself they make the gift look like something made by me.
I'm going to go take a photo of the finished ... thing ... right now, so I can really show it off here after the big day.
Labels:
Amy Butler fabric,
handmade gifts,
home decor
Monday, November 10, 2008
Cute Fabric Baskets
Ooooh, I wanna make some of these, too:
UFO update:
Found the tutorial here.
Best part (aside from handmade gift potential): I already have a bunch of batik 4-patch from 2" squares ready to go. Original plan was to make some pincushions, but the first one was a bit of a dud (tip: squares of soft foam do not work as well for stuffing a pincushion as I'd hoped), so now I think I'll make a few of these. One of these days.
UFO update:
Finished Butterick 5210.
No pics yet, but will post soon-ish.
Sunday, October 5, 2008
Pleated Beauty Handbag

Here’s the Pleated Beauty Handbag I made following the instructions in Amy Karol’s Bend the Rules Sewing. The fabric is a home décor weight that I bought a couple of remnant pieces of from fabricguru.com last year for a home dec project (will take pics and blog that someday, but not today).
Here's the other side, which I like even better.

The contrast pleats are a rayon imitation linen. Not my fave fabric but the color and slightly nubby, slightly loose weave are a good match.

I’ve already made kitchen chair cushions covers from these fabric leftovers (aren’t they cute!), and still have more left. I'm so tempted to make something to wear from this fabric, but am concerned I will look like a couch. Middle-aged spread is depressing enough without wearing upholstery. Might do it anyway... if a decade ever comes that I pull ahead of the UFOs.

Lined with a burnt-orange quilting calico.
I’m not totally thrilled with this. Left out the “semi-rigid insert” for the bottom when I realized it’s not designed to go all the way across. Sorry Amy K., but that just doesn’t look right to me (and now I know what looked a little off to me in the photos of this bag in her book). And (like the “charming” handbag that doesn’t charm me quite as much as I hoped it would), this could benefit from some kind of a closure, or a zippered inner pocket.
No matter, it’s not for me anyway: gift for my sister (other sister, not the one who’s getting the Charming Handbag; they’re both coming to visit in a couple of weeks, and I felt inspired to make something for them).
I think my main issue with this bag is the proportions: it looks too wide to me. But I do really like the contrast pleats. That feature looks great in every version I’ve seen of this bag (there are tons on Flickr). I might try this again and play around with proportions. Or make a solid box bottom, so pleats are on the sides only.
In the meantime, I’ve got a rush-to-finish novel in the works, houseguests coming in two weeks (which is generating a couple of other projects), some dress project challenges to work out, plus all the regular stuff I should be doing every day. More handbags will have to wait.
Saturday, September 20, 2008
Heather Bailey Charming Handbag

My first handbag project: the “Charming Handbag” from Amy Karol’s Bend the Rules Sewing, made from several Heather Bailey “Pop Garden” fat quarters. Pretty easy to do, once I got my hands on some flannel for the facing.
If I’d made this for myself, I would have used the interior fabric on the outside, but this version’s a gift for my sister who I think will like the green rose print better.

I enjoyed making it, and am proud of myself for following the pattern and directions diligently, for a change. Other than adjusting the scale to make sure I could get both front and back pieces from one FQ, that is. I had a lot of ideas of what I could do differently, but decided to challenge myself to make the original first without messing around with it, and then see what I might want to change.
Couldn’t help myself, though, had to add a little patch pocket on the inside. Every purse should have an interior pocket, don’t you think?
Here’s how it will look in action.
If I ever make this again, I would add a closure of some kind. It gapes open: not a great feature in a purse.
And I do think a band of ribbon trim, as Amy K suggests and shows, would be nicer. But my trim selection is dismal at the moment. Got a couple of nice things in a swap, but they’re not right for this fabric. If I can find something appropriate before my sister shows up for a visit next month I’ll might hand-stitch an embellishment to the front. A fabric rose might be pretty, not that I have a clue how to make one. A few minutes with Google would probably take care of that.
Bottom line, I’m not sure I like it enough to make another one, not with so many other handbag possibilities out there and in my head. But it’s cute enough. I’ll call it a successful start at handbag production.
Labels:
handbags,
handmade gifts,
Heather Bailey fabric
Saturday, August 16, 2008
An Apron for My Mom

My Mom’s birthday is coming up, and she loves handmade gifts. Which is often a pain in the you-know-what, and many years she has to make do with store-bought offerings from me. But I do enjoy making things, and this year I (gasp!) planned ahead and got a gift both started and finished before the last minute. Could be a first for me. (Now I just have to remember not to tell her about this blog until after Sept. 13th.)
The apron idea sprouted from the Tie One On “Summer Gingham” apron challenge. All the fabrics are from my stash, except for the gingham. “What gingham?” you ask. Well, it ended up on the back, as lining:

Yeah, not quite in the spirit of the challenge, but the only gingham I could find was icky 65/35 poly/cotton and very transparent, not the sort of thing you want to feature. Also, it’s a blah pale blue 1/8 inch check, so has no visual punch whatsoever. But, because I decided to piece the front, a lining on the flip side to hide seams and wrong-sides seemed like a good idea. And the gingham was fine for that.

The pattern is basically the one from Amy Butler’s “In Stitches” except that I pieced the front and lined the back, and veered rather significantly from the assembly instructions for putting the back and front together (her pattern doesn’t have a back) and doing the bottom edge (mine folds to the back). I also made the waistband and ties about an inch narrower. Next time I’ll interface the waistband. Maybe. I hate fussing with interfacing, so maybe I won’t. But it would be a good idea.
I thought doing the pleats would be a major pain, but they turned out to be easy. I made 1-inch pleats 1-1/4 inches apart, didn’t mark anything, just used pairs of same-color pins to mark which points to bring together:

I knew I'd discover a good use for those colored-head pins someday.
Here the pleats are basted in place (with the towel loop), but not yet pressed:

Hadn’t originally planned to use the hydrangea print at all, but I only had a half-yard of the blue vines (pocket and bottom fabric on the front) and that wasn’t enough to also make the waistband and ties.
I’m quite pleased with how it turned out. Almost wish I’d gone all out and made a skirt, which wouldn’t have been much more work. And I’m thrilled to have finally made something for my mom from the blue rose and teapot/plate prints! Those were both originally purchased with her in mind, and every time I’ve made an attempt to weed out the stash over the past, oh, 15 years or so, I’ve held onto them thinking, “Someday I’ll make something for my mom from those.”
I’m so astonished the day actually arrived, I might have to pinch myself.
The final triumph was getting the entire thing done -- from plunking down uncut fabric on the dining table and plugging the sewing machine in, to final “ta-dah!” moment -- in one afternoon session. May be the first time I’ve ever started something and not had it linger for a while in the UFO (UnFinished Objects) pile.
Total effort, start to finish: about 4.5 hours. That includes several time-eating mind-changes about fabric choice and placement.
Now I want an apron for myself. But I’m gonna hold off until I get some skirts made from my Amy Butler fabrics. Then I’ll make a gorgeous apron out of whatever’s left.
Sunday, August 10, 2008
Pleasant Distractions
It's Sunday, which is supposed to be "get some sewing done" day (if I'm slacking, which means not using Sunday to inch my novel a little bit closer to done).
Instead, I'm blogging, and flipping through Amy Butler's "In Stitches" which I just picked up at the library. Gotta love that interlibrary loan program. I love her fabrics, and although most of the projects in the book aren't anything I've every going to make, it's fun to peruse and ponder. Why sit down and finish a project when you can spend those same minutes dreaming of new projects to start? ("Because..." roll eyes and make snarky comments about the size of the UFO pile).
The book has to go back to the library in a few weeks, so I've copied the instructions for the apron, reversible placemats/napkins set, and lounge pants. I could use an apron, and what a great idea for a gift for my mom! I have one of those moms who answers all "Anything you'd especially like for (XMAs, b'day, Mom's day, etc.)?" questions with the same answer:
"What I'd really like, dear, is something that you've made for me."
Which is fine, I'd rather make than shop, but since my to-do list is usually on the verge of explosion, and since I often don't plan far enough ahead for mom-related gift-giving situations, "something you make" is sometimes more than I can contemplate without groaning or sighing or rolling my eyes or all of the above.
But I've got time to whip up an apron before her b'day next month. Barely. I gotta figure that if it's a one-day project, it will take me a month of a few minutes here and there with long pauses between to get it done.
I'd better go start now...
Instead, I'm blogging, and flipping through Amy Butler's "In Stitches" which I just picked up at the library. Gotta love that interlibrary loan program. I love her fabrics, and although most of the projects in the book aren't anything I've every going to make, it's fun to peruse and ponder. Why sit down and finish a project when you can spend those same minutes dreaming of new projects to start? ("Because..." roll eyes and make snarky comments about the size of the UFO pile).
The book has to go back to the library in a few weeks, so I've copied the instructions for the apron, reversible placemats/napkins set, and lounge pants. I could use an apron, and what a great idea for a gift for my mom! I have one of those moms who answers all "Anything you'd especially like for (XMAs, b'day, Mom's day, etc.)?" questions with the same answer:
"What I'd really like, dear, is something that you've made for me."
Which is fine, I'd rather make than shop, but since my to-do list is usually on the verge of explosion, and since I often don't plan far enough ahead for mom-related gift-giving situations, "something you make" is sometimes more than I can contemplate without groaning or sighing or rolling my eyes or all of the above.
But I've got time to whip up an apron before her b'day next month. Barely. I gotta figure that if it's a one-day project, it will take me a month of a few minutes here and there with long pauses between to get it done.
I'd better go start now...
Subscribe to:
Posts (Atom)