
Thanks for your comments on the Cosmo Bag!
Alas, a new needle has not solved the swishy sound my machine now makes with each stitch. Best guess is the metal shank thingie that moves the needle up and down is gently brushing against something else inside there out of sight. It's not interfering with performance (yet), but it's like an ill-fitting sneaker: you can go for a run but might come home with a blister. Further investigation will be left to the repair guy.
In the meantime, since it's now the weekend and the machine is still sewing okay, I probably won't be able to resist a few more seams before I take it in on Monday. And since the next 'palooza block will go live on Monday morning, I might even do that first thing. We'll see how any further weekend sewing goes.
Marie-Christine, something in your comment on shrinking curves led me to think about (next time) using some kind of light-weight, maybe wash-out, fusible strip to hold the edges of the clipped and turned-back curves in place. Having shrunk the pattern, I was working both with a narrower seam allowance (3/8" instead of 1/2") and a tighter curve, which I clipped generously. All those little clipped seam allowance bits did not stay pressed back, and wrestling with two facing layers of that and the curve was more work that it should have been. A strip of some kind of adhesive that would not interfere with sewing would have helped a lot.
Any ideas, readers? I haven't used that kind of product before, but I know they exist. It would have to be something narrow, that would follow a curve without puckering. I could even pick some up when I take my machine in on Monday.
Meanwhile, I'm previewing February's project, the "Reversible Everyday Shopper," and already thinking about how I'm going to change/resize that one.
Showing posts with label miscellaneous crafty stuff. Show all posts
Showing posts with label miscellaneous crafty stuff. Show all posts
Saturday, January 29, 2011

Saturday, November 6, 2010
Super-Quick Ironing Board Cover
I posted a while back my "someday" intention to do something about the truly grubby cover on my ironing board. I finally got around to it a week or so ago.


Key to making this quick and easy was starting with the replacement muslin cover that had come with the ironing board when I bought it several years ago. I came across it when I was tiding up the sewing room, pre-trip, and was smart enough to set it aside where I would see it again when I got back.
This end-of-bolt length of butterfly fabric -- a bit over a yard and part of my in-person FabricDepot binge -- was a good size, so I lay it out on the hall floor, face down, lay the muslin cover on top of it, and cut that shape from the fabric with pinking shears. I lifted up the edge of the muslin as I went along so my fabric cut-out was just slightly smaller than the muslin.
Then I flipped both layers over and added a few pins to hold things in place. Here it is before pinning:
This end-of-bolt length of butterfly fabric -- a bit over a yard and part of my in-person FabricDepot binge -- was a good size, so I lay it out on the hall floor, face down, lay the muslin cover on top of it, and cut that shape from the fabric with pinking shears. I lifted up the edge of the muslin as I went along so my fabric cut-out was just slightly smaller than the muslin.
Then I flipped both layers over and added a few pins to hold things in place. Here it is before pinning:

If it looks wide, that's because I have one of those extra-wide ironing boards, which is great for pressing quilting yardage. You can see exactly how careful and precise my cutting was here:

When pinned, I took it to the machine and sewed around the edge with a zig-zag stitch, equally carefully:

Lickety-split and it was ready to go.
The thin padding beneath the old muslin cover was not adequate. My iron puts out a lot of heat and steam on the "cotton" setting (which I use a lot) and the metal grate under the pad would get very hot. I sacrificed a towel from the "workout towels" pile for additional padding. I simple lay it over the board with the old pad on top (you can see the indelible grate impression below), put my new, double-layer (muslin + print) cover on top, and tightened the drawstring to pull it all into shape around the board.
The thin padding beneath the old muslin cover was not adequate. My iron puts out a lot of heat and steam on the "cotton" setting (which I use a lot) and the metal grate under the pad would get very hot. I sacrificed a towel from the "workout towels" pile for additional padding. I simple lay it over the board with the old pad on top (you can see the indelible grate impression below), put my new, double-layer (muslin + print) cover on top, and tightened the drawstring to pull it all into shape around the board.

Then I cut off the edges of the towel that were hanging out (didn't finish the edges, or nuthin', just snipped 'em off), and was done.
Total time for task: didn't track, but I doubt it was more than 10 minutes. That was after I waited for the cat to fall asleep so he wouldn't pounce on the fabric laid out on the floor and roll around on it.
How long it took me to get around to this quick and easy task? I'm not saying. If I'd had any sense I would have waited a couple more days and done this on Nov. 1, instead of in October, so it would count toward the 100 Yard Challenge.
Total time for task: didn't track, but I doubt it was more than 10 minutes. That was after I waited for the cat to fall asleep so he wouldn't pounce on the fabric laid out on the floor and roll around on it.
How long it took me to get around to this quick and easy task? I'm not saying. If I'd had any sense I would have waited a couple more days and done this on Nov. 1, instead of in October, so it would count toward the 100 Yard Challenge.
Monday, June 7, 2010
my sewing room needs one
The most brilliant idea of the week month year: I must make one of these for my sewing room.
(Thanks to "HowAboutOrange" for the link.)
I've been scribbling "next steps to complete X project" lists on scraps of paper and then wonder were I put them. On the wall, duh, where I can see them.
I'll need to test some fabrics (my stash is thin in the "light" color ranges) to find one that won't make whatever notes I write difficult to read.
Now, where did I stash those old poster frames? Fingers crossed my dry-erase markers will both write on and wipe off of aging plexiglass...
(Thanks to "HowAboutOrange" for the link.)
I've been scribbling "next steps to complete X project" lists on scraps of paper and then wonder were I put them. On the wall, duh, where I can see them.
I'll need to test some fabrics (my stash is thin in the "light" color ranges) to find one that won't make whatever notes I write difficult to read.
Now, where did I stash those old poster frames? Fingers crossed my dry-erase markers will both write on and wipe off of aging plexiglass...
Thursday, May 20, 2010
Dressing up my desk
No, these are not dinner napkins...



... although they are made just like 'em (cut a large square, make a narrow double-fold hem with neatly mitered corners).
Actually, the red one in the middle is a napkin, "luncheon" size, I'm calling it. That one's becuase I had a small piece of the red colorway lying around, and I figured why not make one more. I eat lunch at my desk a lot. Sometimes that's because I'm on a roll and want to keep going on a project, but more often I'm using my lunch break to blog-surf or catch up on personal emails.
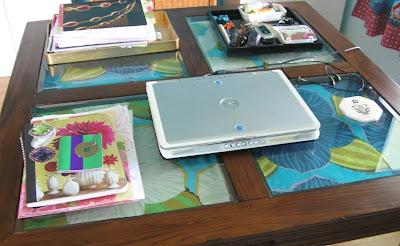
The four large ones are for my desk. Which is really a square dining table, and which has these very cool glass-covered sections. Each is about 15.5" square and 3/4" deep, with a bevelled glass top. The insets have a woven reed lining, which is a blah brown that I've never liked (I am a COLOR fiend, as you may have noticed).

In the past, I've lined these sections with beautiful papers of the heavy/expensive hand-made, gift-wrappy kind, and sometimes I've put little trinkets in there, too. Sort of a 3D collage of pretty things and favorite stuff.
When we last moved, a year ago (yikes, it's been that long?!), I tossed the faded old paper and disassembled everything for packing. Then reassembled here, without doing anything at all in terms of desk decor. Because moving is hassle and a time-eater, and I wanted to get set up and back to business. I figured I'd dress the desk back up in a little bit, when I had the time and felt inspired.
I've had the inspiration/plan for a while now: make some cloth inserts from fabric left over after making my office curtains. But the time-motivation thing didn't happen until this past weekend. When I produced these, cleaned up the desk, and got them in place:
I've had the inspiration/plan for a while now: make some cloth inserts from fabric left over after making my office curtains. But the time-motivation thing didn't happen until this past weekend. When I produced these, cleaned up the desk, and got them in place:

Don't they look nice?
Of course, this is a WORKING desk, and although I like to think I'm a smidge toward the "tidy and organized" end of the spectrum, my desk typically looks something like this:

So glimpses of flowers is what I get. I'm thrilled, though, to have finally crossed this off the "someday" list, and to have a more colorful, cheerful, and inspiring desk to sit at all day.
Now, if you'll excuse me, it's time for me to stop blogging and go get some "real work" done...
Monday, May 17, 2010
Future project #2
Here's one reason I haven't posted any tutorials yet:

I love this ironing board. It's extra wide, and super sturdy. My old one used to collapse on me on a regular basis, which led to much hissing and/or yelling of obscenities on my part and a refusal to ever iron anything. But this one's great. Except that I've been using it for several years now with the default muslin cover that came with it. Which has not stood up well to the great blasts of heat and steam that come from my super-duper iron.
From time to time I start to photograph the steps of something that might become a tute, but inevitably some pressing is involved, and I think, "cr*p, I can't use a photo of this hideous thing."
So, future project #2 is to make a new ironing board cover. Easy project, but the only fabrics in my stash of long enough length are pricey designer cottons that I'm not willing to sacrifice for this purpose (unless the day comes when I decide I'll never get around to making whatever it was I thought I'd sew from them, which is entirely possible but hasn't happened yet).
I'd run right out and get some fabric except I'm about 40 days into a 120-day fabric-and-pattern embargo. And I really mean to stick with it this time.
On the other hand, once the embargo is over, a splurge on a suitable length of something pretty to re-cover the ironing board would make a nice reward for honoring the embargo for the complete term (for once!).
In the meantime, my ironing board remains blotchy and scorched and discolored, and any tute photos that involve pressing will have to wait.
What's that? How's the Kyoto Skirt coming along? Um, well, I sewed up the patch pockets for the muslin this weekend. A grand total of about :10 of sewing time put in over the past several weeks. So it still qualifies as an "active" project (incomplete, but not a UFO just yet), although progress is slow.
What's that? How's the Kyoto Skirt coming along? Um, well, I sewed up the patch pockets for the muslin this weekend. A grand total of about :10 of sewing time put in over the past several weeks. So it still qualifies as an "active" project (incomplete, but not a UFO just yet), although progress is slow.
Sunday, May 16, 2010
Future project #1

Some days you see something you look at every day, and really see it. Or, in this case, you see how faded and ratty it has become.
This little pillow lives on my deck chair, and I'm very fond of it, because of all the many "throw" pillows in the house it is the only one that fits the small of my back just right on this chaise. It was once bright orange/white, with lime green welt around the edge.
It hasn't been anywhere near those colors for some time now. I'd noticed it was fading, just hadn't felt any need to do anything about it. Until this morning. It is now officially "future project #1".
Which doesn't mean I will get to recovering it anytime soon. But I officially acknowledge that it has devolved into an eye-sore, and merits a return to beautiousness one of these days.
I did get to another "someday" project this weekend (and even finished it, thus avoiding the usual consequence of starting something new, which is to add to the UFO pile). Haven't sorted through pics yet, but will show it off shortly.
Monday, November 2, 2009
... and a pillow for my desk chair
to go with the curtains:

I whipped up a pillow for my desk chair yesterday afternoon, to go with my new home office curtains. My chair is really a dining chair, and I sit on the front half of it while working, so a big fat pillow to fill up the space behind me is welcome. The white Guest of Honor fabric is from the stash, and I consider the border fabric stash also, as it's from the piece left over after making the top borders for the curtains. It's the same on both sides, except that the big white blossoms are positioned slightly differently.
I used a 20" square pillow form, and the "Sunset Button Pillows" pattern from Amy Butler's Softwares. I even read and (mostly) followed the directions! I had to size down (Amy's pillows are huge: 27"), and I skipped the buttons, but did the rest according to plan.
I love how the flanges turned out, and the whole thing was super quick and easy to do. Except for sewing the seam through both sides between the flange and pillow body (so the flanges become flanges, not just a bigger pillow cover) ... in spite of pinning, it was tricky to get the seams lined up just right. I was in my usual slapdash mood and, after considering briefly the pros and cons of doing a super-careful, precise job, did a quickie, imprecise one instead. Unless you look closely, which no one but me will ever do, you can't tell that my "stitch in the ditch" wanders on and off the ditch more than it stays in it.
The only drawback to this pattern is that the pillow cover is entirely sewn on, no zipper or other closure, so it's not removable for washing. I have zippers in the stash, and could have added one. But I didn't want to bother, so I'll just have to be careful not to spill coffee on this one.
Saturday, January 31, 2009
Oh, the Possibilities!
My Kaffe Fasset fabric binge arrived this week. Oh man, are these prints gorgeous!
All of these were purchased on impulse due to a half-price sale (would this be a good place to confess that I have, already, as of the last day of January, purchased HALF of my target yardage for the entire year?). I got mostly 1-yard cuts with a few 2-yards from prints I thought I might want to wear.
Mostly I had in mind a paper-pieced quilt project of some kind, so made sure to get some darks, some brights, some pastels, and some prints that--in small pieces--would yield multiple pattern/color impressions.
What I've ended up with are some combos that I so want to wear that I'm gonna start with fashion projects, and use the scraps for future quilting. As indulgent as these photos may seem, there are about 4 more prints I haven't photographed. Maybe more than 4. I'm too embarrassed to go count them.
Here's combo #1:

There's a blouse in there somewhere. The little strip of pink/red showing in the middle is the only one of the prints purchased that I am not completely 100% gaga over. That doesn't mean I don't like it (what's not to like about KF?), just that the drool factor on that one is lower than expected. But I like how a hint of it pops with the other two. Don't have a pattern in mind yet, blouse-y contemplation still going on.
Combo #2

The Paperweight print in "algae" colorway (far left) I already had... waiting for me to acquire something to go with it. Et voila. I'm picturing a long sleeveless tank dress from these, maybe with gathered tiers to the skirt, maybe with a somewhat shaped bodice (princess seaming, plain old darts?). I have a few rayon numbers of that ilk in frequent wear rotation for inspiration. Probably will grab a bodice pattern from somewhere, improvise the skirt.
Combo #3

These have to become an ankle-length peasant skirt. They just have to. I'm giddy with anticipation of wearing the finished garment, and cringing at the thought of tackling yet another gathered monstrosity.
I'm only about a third of the way through Peasant Skirt #2 (from blue/green Amy Butler fabrics, stay tuned for pics of that), and man, the basting, the fussy gathering and pinning. Ugh, what a chore. I took me months to recover from the mind-numbing tedium of making the Parrokeet Peasant Skirt . I'm sure I'll be as sick of the gathered-tier process again by the time I'm done with the AB one.
So what has got into me to already be planning another?
Well, I wore the Parrokeet skirt the other day, and remembered how much I like it. It's so ultra-comfy, and fun to wear, and I get a kick out of the goofy fabric and bright colors. I'm much happier with it than with any of the garments I've made from patterns lately. And they're a great way to mix and match gorgeous fabrics like these.
So perhaps I should give in to impulse, embrace my bohemian side and make/wear lots and lots of peasant skirts.
Excuse me while I go add "patchouli oil" to my shopping list...
Come to think of it, I have a bottle of Mandarin Orange and Patchouli body wash in my shower, and it's divine (i.e., not overly patchouli-y). A quick visit to the Nature's Gate website reveals they make a body lotion in that fragrance, too. Hmmm, maybe revisiting my youth isn't such a bad idea.
Yes, I'm old enough to have done the peasant-skirt-and-patchouli thing the first time around, in case you were wondering.
It was fun. I think I'll do it again.
All of these were purchased on impulse due to a half-price sale (would this be a good place to confess that I have, already, as of the last day of January, purchased HALF of my target yardage for the entire year?). I got mostly 1-yard cuts with a few 2-yards from prints I thought I might want to wear.
Mostly I had in mind a paper-pieced quilt project of some kind, so made sure to get some darks, some brights, some pastels, and some prints that--in small pieces--would yield multiple pattern/color impressions.
What I've ended up with are some combos that I so want to wear that I'm gonna start with fashion projects, and use the scraps for future quilting. As indulgent as these photos may seem, there are about 4 more prints I haven't photographed. Maybe more than 4. I'm too embarrassed to go count them.
Here's combo #1:

There's a blouse in there somewhere. The little strip of pink/red showing in the middle is the only one of the prints purchased that I am not completely 100% gaga over. That doesn't mean I don't like it (what's not to like about KF?), just that the drool factor on that one is lower than expected. But I like how a hint of it pops with the other two. Don't have a pattern in mind yet, blouse-y contemplation still going on.
Combo #2

The Paperweight print in "algae" colorway (far left) I already had... waiting for me to acquire something to go with it. Et voila. I'm picturing a long sleeveless tank dress from these, maybe with gathered tiers to the skirt, maybe with a somewhat shaped bodice (princess seaming, plain old darts?). I have a few rayon numbers of that ilk in frequent wear rotation for inspiration. Probably will grab a bodice pattern from somewhere, improvise the skirt.
Combo #3

These have to become an ankle-length peasant skirt. They just have to. I'm giddy with anticipation of wearing the finished garment, and cringing at the thought of tackling yet another gathered monstrosity.
I'm only about a third of the way through Peasant Skirt #2 (from blue/green Amy Butler fabrics, stay tuned for pics of that), and man, the basting, the fussy gathering and pinning. Ugh, what a chore. I took me months to recover from the mind-numbing tedium of making the Parrokeet Peasant Skirt . I'm sure I'll be as sick of the gathered-tier process again by the time I'm done with the AB one.
So what has got into me to already be planning another?
Well, I wore the Parrokeet skirt the other day, and remembered how much I like it. It's so ultra-comfy, and fun to wear, and I get a kick out of the goofy fabric and bright colors. I'm much happier with it than with any of the garments I've made from patterns lately. And they're a great way to mix and match gorgeous fabrics like these.
So perhaps I should give in to impulse, embrace my bohemian side and make/wear lots and lots of peasant skirts.
Excuse me while I go add "patchouli oil" to my shopping list...
Come to think of it, I have a bottle of Mandarin Orange and Patchouli body wash in my shower, and it's divine (i.e., not overly patchouli-y). A quick visit to the Nature's Gate website reveals they make a body lotion in that fragrance, too. Hmmm, maybe revisiting my youth isn't such a bad idea.
Yes, I'm old enough to have done the peasant-skirt-and-patchouli thing the first time around, in case you were wondering.
It was fun. I think I'll do it again.
Friday, October 10, 2008
Batik Buttons

Aren't they cute?
I made these buttons (5/8") last night in about 30 seconds from some batik scraps, so I could include a little handmade something in a swap. The photograph isn't great, but the buttons are so adorable I want to keep them for myself.
Fortunately I have lots more batik scraps and button forms are easy to get... I see more fabric-covered buttons in my future for sure.
Now, if I could just master the macro and flash functions on my camera (flash controls are particularly aggravating and heedless of my commands).
Subscribe to:
Posts (Atom)



