Block 9, from Scott at Blue Nickel Studios, is called "Lemonade Stand" and it's a doozy. I cringed when I saw those tiny geese in the center, but it's worth playing with the teeny pieces:
Rummaging around in the scrap piles (my large scraps used to be in a bin, but are now in heaps all over my sewing room; these blocks keep coming before I can clean up), I found a piece of Heather Bailey print perfect for fussy cutting corners. Once I committed to that, throwing the other HB candy-colored prints in the mix was a must.
The geese got into quite a state at all the excitement and insisted on fleeing the scene, so they are facing out, rather than swirling around the center. I don't blame them. I'm calling this one "explosion at the candy factory."
My inner four-year-old loves these prints, but they are so young and sugary sweet they've never fit in well with the rest of my stash. This block was fun to throw together, but it's making my teeth ache. If I'm going to go over-the-top/off-the-deep-end (as has been known to happen) I prefer a more grown-up goofiness.
Like this:
This is the "by the rules one," planned around using the last of an old Kaffe Fassett charm pack for those corner squares. I'd already trimmed these long ago to 4" for something they never got used for (don't remember what), so reducing them to 3.5 didn't seem like a big deal. I hadn't used the dots in a few blocks, and they were feeling neglected, so they got to join in the fun, too.
I wish now that I'd squared up the 9-patch center unit before adding the sides, as it is clearly not square, but I was tired and hungry and impatient and just wanted to get it done. No chance I'll go back and redo it, so I'm crossing my fingers it will look fine once quilted.
BTW: I made all the geese for these two blocks the "wasteful" way: sewing a diagonal across 1.5" squares on top of a 1.5"x2" rectangle and trimming the extra. Which is way too tiny to make HSTs from, and a few square inches of fabric, total, so hardly a big waste. No way I was going to follow the instructions, which assumed a higher tolerance for lining up and sewing (accurately! without stretching!) little bias edges than I will ever have. The squares were so small I didn't even bother penciling in the seam lines, just eye-balled it.
Showing posts with label Heather Bailey fabric. Show all posts
Tuesday, February 22, 2011
Thursday, December 9, 2010
Amy B. Origami Bags - Set 2
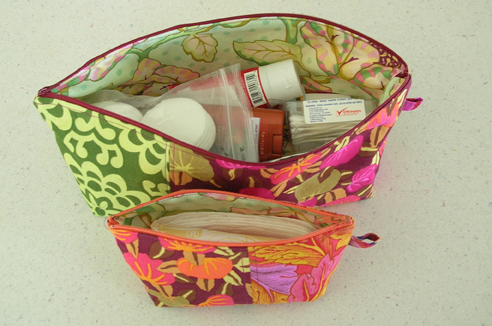
Here are the other two Origami Bags I made from (from Amy B's new bag book):
The front one is taller than Amy makes 'em, accomplished by taking a very shallow corner seam. It is perfectly sized for those "feminine necessities" we sometimes need to have at hand. Both these have that lovely Heather Bailey print inside. I was so happy to find a good use for that print. It's lovely, but a little too pretty/girly for other purposes I'd considered. It's perfect to line these bags.
I look forward trying out more patterns from Amy's book, after I get some more XMas sewing done.
The larger one is 14" across the top, the smaller one 7". That's the last small bit of the orange leaf print, which I wish I had more of. Both these bags feature my fave "Persimmons" by Kaffe Fassett. I have very, very little of this left so was thrilled to find it on sale at Fabric.com, and could not resist ordering 2 yards to replenish the stash. Even though I am not supposed to be doing ANY stash-building until substantial yardage is used up.
My questionable logic is that, technically, "virtual Santa" bought it to go under the tree, but still. More fabric. 2011 will be all about stash busting, because I am close to the point of having no room for more yardage (not to mention a drained hobby budget!).
The larger bag is Amy's proportions. It holds all kinds of bathroom stuff, and got use again last weekend on an overnight getaway to Kona. Amazing how a couple hours in the car and a night at a resort feels like getting away for days. Hoping for more frequent short getaways next year.
The front one is taller than Amy makes 'em, accomplished by taking a very shallow corner seam. It is perfectly sized for those "feminine necessities" we sometimes need to have at hand. Both these have that lovely Heather Bailey print inside. I was so happy to find a good use for that print. It's lovely, but a little too pretty/girly for other purposes I'd considered. It's perfect to line these bags.
I look forward trying out more patterns from Amy's book, after I get some more XMas sewing done.
Wednesday, December 8, 2010
Amy B. Origami Bags - Set 1
So, I'm really slow getting these pics up. Here, at last, are the first of the Origami Bags (from Amy B's new bag book) I made for corralling travel stuff. I strayed from Amy's exact sizing on some of these, as I was using whatever caught my eye from the scrap drawer, and with whatever odds and ends of mid-weight fusible interfacing I could find.
If you are looking for an excellent last-minute homesewn gift idea, I highly recommend one or more Origami bags. BTW: the book calls for making these from home dec weight fabric, but as you can see, quilting weight works just fine, too. And don't worry about having exactly the interfacing called for. I used probably three different kinds and weights in my not-matching set, with no problem at all.
I would have made some of these for XMas gifts, but I used up all but tiny scraps of my mid-weight interfacting stash on the ones for myself, and haven't managed to restock yet. Maybe next year.
This is the smallest one. If I'd blogged this closer to sewing day I would remember more precisely how it might vary from the littlest Origami pattern in the book, other than it's made from just one piece of fabric on each side, rather than having pieced sides like all the others.
I also made it a bit longer than the pattern, partly because I only had a narrow piece of this fabric, and also to fit the intentended contents, which were my pink iPod Nano and my ancient cell phone + earpiece, as you see here. This one came along in my purse. That's a Kaffe Fasset print on the outside, Heather Baily on the inside.These two are a bit larger. The green one in front was the first I made, so it's the most accurate rendition of Amy's sizing and proportions. That came in my purse, too, as it held the requisite 1qt. zip-lock baggie of hand sanitizer etc. Sure, I coulda just stuck the plastic baggie in my purse, but who doesn't like pretty fabric better than plastic?
This whole project started when I made the green one, thinking it would be handy to corrall all the powercords and rechargers I was taking with me. But, duh, I didn't pay enough attention to the photos and diagrams in the book when I selected what size to make, because these bags are all about 2" longer at the zipper than they are at the base. So when I got the first one done, and went to fill it up, it turned out to be just a little bit small for the purpose.
So I made another: the pink and orange one in the back. It's about 12" long and intentionally wider/flatter than Amy's design (accomplished by taking a deeper cross-seam when forming the corners of the base). From a purely design standpoint, the proportions of this one are not as pleasing, but it's the perfect size for everything I wanted to stash in it: chargers and power cords for the camera battery, the iPod, the cell phone, and my Kindle. It holds a lot of cords. This one went into my suitcase, and I was very pleased with it.
These were so quick and fun, I made two more. Which I either never took or have lost the photos of. I'll remedy that shortly. They are just like these three, only slightly different. If you are looking for an excellent last-minute homesewn gift idea, I highly recommend one or more Origami bags. BTW: the book calls for making these from home dec weight fabric, but as you can see, quilting weight works just fine, too. And don't worry about having exactly the interfacing called for. I used probably three different kinds and weights in my not-matching set, with no problem at all.
I would have made some of these for XMas gifts, but I used up all but tiny scraps of my mid-weight interfacting stash on the ones for myself, and haven't managed to restock yet. Maybe next year.
Sunday, May 23, 2010
Kyoto Skirt preview

The Kyoto "muslin" is done. Here's a preview (it's midday, but dark and rainy at the moment, not good for anything but a quickie on-the-hanger snapshot. I'll model it for you as soon as conditions improve and I can corral Mr. de H. into photog duty.)
As you can see, my fabric choices started out a bit silly, and got worse, which is what happens when you decide to make a muslin from all the stuff in your stash you aren't likely to ever use for anything else.
I didn't bother with elastic at the waist, just made some ties. I forgot to leave the little tie openings in the side seams when I sewed them up, so figured, "it's a muslin, what the h*ll, I'll just put the openings in the facing and put that on the outside" -- which is a design option, not just me losing my mind.
Once I'd done that, I figured I might as well put the hem facing on the outside, too. It's a bit much. I kinda like it ("a bit much" is not necessarily a bad thing in my world), but can't decide if the overall effect is waaaaaaaay too young for me, or overly grandmotherly, or somehow both.
I almost left the pockets off, but I'd already made them (double-layer, with the polka dots on the inside), so slapped 'em on, and discovered that patch pockets alone made the whole thing look too much like an apron, so I added the polka-dot pocket flaps, too.
You can see the godet in back hangs lower than the front, which I gotta say is one of my fave features of this skirt. Booty issues mean that a "straight" hem ends up not straight at all on me, unless I make adjustments. With this skirt, all that is a non-issue.
I was a bit optimistic when choosing to muslin a size 12, which is snug around the belly and hip area. But you know what? It's a bit less snug than when I first did up the main seams a couple weeks ago. Another month or two of workouts with Tony *, and it might even be wearable.
* Totally not my idea, but hubbie's into it, so I've been doing it too. Even at my wimpy pace it's having a nice effect.
Sunday, April 25, 2010
Kyoto Skirt Muslin
My Kyoto Skirt pattern has finally arrived, and I'm ready to jump in.
Almost. I've decided to "muslin" before cutting into the fabric I have in mind. Don't really want to, but gut says I should.
Do you ever feel like you've got an imp on one shoulder whispering: "You don't need to make a muslin! It will be fine. Cut the good stuff already and let's get sewing!" And on the other shoulder is your guardian sewing angel, trying to get your attention: "Don't listen to her! You'll be sorry if you don't make a muslin first."
Sometimes I listen to the imp, some days I heed the angel. I've decided to heed the angel this time because this is my first Hot Patterns pattern, and I don't know how that line will fit. Going by the HP size chart, length should be okay, but my waist and hip measurements are smack dab in the middle between a 12 and a 14. So which is the best choice? Since this is not a tightly fitted garment, I'm going to try the 12, because who doesn't want to sew the smaller size? Based on flat measures of the pattern I should end up with 4" of ease in the hip, which isn't huge, but ought to be enough. We'll find out.
First up, what to muslin from? As you can see from the photo above, I've gone a little goofy with it. The main fabric is the Kaffe Fassett "anemone" in pink/purple that I decided not to use for my hexies quilt project. A bit of an odd choice for this pattern, more so if I make patch pockets from a piece of uber-girly Heather Bailey print from the stash. And why not throw some polka dots in there, while we're at it? (I had the insane impulse, just for a moment, to make the godet from the Heather Bailey print, too, but even at my goofiest I don't need to walk around with an explosion of flowers coming out of my butt.)
My inner 4-year old is going to love this skirt. Assuming it turns out wearable. I might even go totally wild and make the bellows pockets and flaps. Just for the hell of it. Since this supposed to be a quickie muslin I'm skipping the piping and top-stitching, and won't bother with interfacing all the curved edges (isn't that what stay-stitching is for?), although I'll edge-stitch the yoke curves and godet seam for stability.
If this one lives up to expectation, I'll go ahead and cut into the dark olive twill I've been seeking a purpose for. That one will be a more sedate version.
Almost. I've decided to "muslin" before cutting into the fabric I have in mind. Don't really want to, but gut says I should.
Do you ever feel like you've got an imp on one shoulder whispering: "You don't need to make a muslin! It will be fine. Cut the good stuff already and let's get sewing!" And on the other shoulder is your guardian sewing angel, trying to get your attention: "Don't listen to her! You'll be sorry if you don't make a muslin first."
Sometimes I listen to the imp, some days I heed the angel. I've decided to heed the angel this time because this is my first Hot Patterns pattern, and I don't know how that line will fit. Going by the HP size chart, length should be okay, but my waist and hip measurements are smack dab in the middle between a 12 and a 14. So which is the best choice? Since this is not a tightly fitted garment, I'm going to try the 12, because who doesn't want to sew the smaller size? Based on flat measures of the pattern I should end up with 4" of ease in the hip, which isn't huge, but ought to be enough. We'll find out.
First up, what to muslin from? As you can see from the photo above, I've gone a little goofy with it. The main fabric is the Kaffe Fassett "anemone" in pink/purple that I decided not to use for my hexies quilt project. A bit of an odd choice for this pattern, more so if I make patch pockets from a piece of uber-girly Heather Bailey print from the stash. And why not throw some polka dots in there, while we're at it? (I had the insane impulse, just for a moment, to make the godet from the Heather Bailey print, too, but even at my goofiest I don't need to walk around with an explosion of flowers coming out of my butt.)
My inner 4-year old is going to love this skirt. Assuming it turns out wearable. I might even go totally wild and make the bellows pockets and flaps. Just for the hell of it. Since this supposed to be a quickie muslin I'm skipping the piping and top-stitching, and won't bother with interfacing all the curved edges (isn't that what stay-stitching is for?), although I'll edge-stitch the yoke curves and godet seam for stability.
If this one lives up to expectation, I'll go ahead and cut into the dark olive twill I've been seeking a purpose for. That one will be a more sedate version.
Saturday, September 20, 2008
Heather Bailey Charming Handbag

My first handbag project: the “Charming Handbag” from Amy Karol’s Bend the Rules Sewing, made from several Heather Bailey “Pop Garden” fat quarters. Pretty easy to do, once I got my hands on some flannel for the facing.
If I’d made this for myself, I would have used the interior fabric on the outside, but this version’s a gift for my sister who I think will like the green rose print better.

I enjoyed making it, and am proud of myself for following the pattern and directions diligently, for a change. Other than adjusting the scale to make sure I could get both front and back pieces from one FQ, that is. I had a lot of ideas of what I could do differently, but decided to challenge myself to make the original first without messing around with it, and then see what I might want to change.
Couldn’t help myself, though, had to add a little patch pocket on the inside. Every purse should have an interior pocket, don’t you think?
Here’s how it will look in action.
If I ever make this again, I would add a closure of some kind. It gapes open: not a great feature in a purse.
And I do think a band of ribbon trim, as Amy K suggests and shows, would be nicer. But my trim selection is dismal at the moment. Got a couple of nice things in a swap, but they’re not right for this fabric. If I can find something appropriate before my sister shows up for a visit next month I’ll might hand-stitch an embellishment to the front. A fabric rose might be pretty, not that I have a clue how to make one. A few minutes with Google would probably take care of that.
Bottom line, I’m not sure I like it enough to make another one, not with so many other handbag possibilities out there and in my head. But it’s cute enough. I’ll call it a successful start at handbag production.
Labels:
handbags,
handmade gifts,
Heather Bailey fabric
Friday, September 5, 2008
Pink, White, Red

I am so grooving on these colors in bold, oversized florals right now. Still haven't hemmed the Amy Butler peony skirt (it's on this weekend's projects list), but love love love the fabric.
So I bought more. And a couple of others by Michael Miller. One yard each, thus demonstrating some moderate restraint. I thought I'd given up quilts -- not that I was churning them out at anything more than a one-per-decade pace -- in favor of making clothes, but the vision of a quilt from these pink-white-red florals has seized my imagination and won't let go.
I'm gonna start stockpiling these prints as I find them, think about a really simple setting (oversized florals = keep the pieces on the biggish size) and see if I can come up with some idea of how many different patterns I'm gonna aim to collect before getting started. I might just do 5-6" squares with white sashing. The fabrics are so gorgeous a fancy block setting will be overkill.
Also ordered a nice set of Kaffe Fassett "charm" pieces (5" squares) and Heather Bailey fat quarters. Don't know yet what I'm gonna do with those. Looking forward to getting inspired by them when they arrive.
First, I have to turn my attention back to my "get this stuff done and your weekend playtime can start" list. Still many items on it, and would like to get them all crossed off before noon tomorrow. Hope to post some new sewing projects by Monday...
Subscribe to:
Posts (Atom)