Thursday, May 27, 2010
Kaffe Fassett hexie flowers
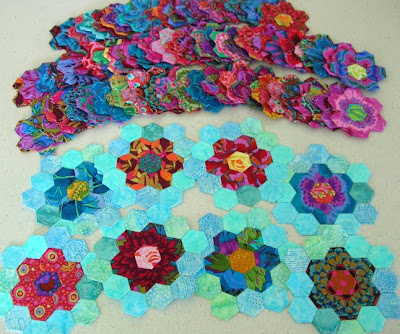
I used to think I watch way too much TV, but now that I have become addicted to paper-pieced hexagons (the perfect hand-sewing project for couch potato time) there's no such thing as too much. Shown here: the product of the past couple of months.
The "petals" are all Kaffe Fassett fabrics, centers are mostly from the scrap bin. As you can see, each flower will also receive a ring of assorted watery batik blues. Once that's done, some bits of leafy greens will connect them all together.
In addition to TV time, I've also discovered that sewing up a flower or two first thing in the morning is calm and meditative, and a lovely way to start the day. And slightly more productive than reading or just staring into space for half an hour, which is what I used to do while caffeinating.
I'm proceeding at a much faster rate than expected, now that I'm keeping my fingers busy during formerly lazy time. Nevertheless, there's a long, long way to go before completion.
Monday, May 24, 2010
the Summer of No Pants
I've signed up for the Summer of No Pants skirt-sewing challenge over at Marigold's delightfully-named blog, "Hideous! Dreadful! Stinky!"

Not that I need any encouragement to sew up a few more skirts. Or reason to wear more skirts, since I am a daily skirt-wearer, and frequent skirt sewer, anyway.
What I find funny about this is that I am supposed to be learning how to sew pants this summer.* You wouldn't know it by looking around my sewing room, but I joined (and appear to have dropped out of) the spring-summer jeans sew-along over at PatternReview. I managed to trace a pattern and then bury it under a pile of other stuff, and that's the sum total of my progress so far. Much as I'd like to have pants that fit sewn up by, say, early October, it very well could be the summer of no pants around here.
* The original goal was to learn how to sew pants last winter; when that didn't happen I pushed it to a summer 2010 goal. Mostly what I've done so far is accumulate enough fabric to make at least six pairs of pants, which is about five pairs more than I need.
Sunday, May 23, 2010
Kyoto Skirt preview

The Kyoto "muslin" is done. Here's a preview (it's midday, but dark and rainy at the moment, not good for anything but a quickie on-the-hanger snapshot. I'll model it for you as soon as conditions improve and I can corral Mr. de H. into photog duty.)
As you can see, my fabric choices started out a bit silly, and got worse, which is what happens when you decide to make a muslin from all the stuff in your stash you aren't likely to ever use for anything else.
I didn't bother with elastic at the waist, just made some ties. I forgot to leave the little tie openings in the side seams when I sewed them up, so figured, "it's a muslin, what the h*ll, I'll just put the openings in the facing and put that on the outside" -- which is a design option, not just me losing my mind.
Once I'd done that, I figured I might as well put the hem facing on the outside, too. It's a bit much. I kinda like it ("a bit much" is not necessarily a bad thing in my world), but can't decide if the overall effect is waaaaaaaay too young for me, or overly grandmotherly, or somehow both.
I almost left the pockets off, but I'd already made them (double-layer, with the polka dots on the inside), so slapped 'em on, and discovered that patch pockets alone made the whole thing look too much like an apron, so I added the polka-dot pocket flaps, too.
You can see the godet in back hangs lower than the front, which I gotta say is one of my fave features of this skirt. Booty issues mean that a "straight" hem ends up not straight at all on me, unless I make adjustments. With this skirt, all that is a non-issue.
I was a bit optimistic when choosing to muslin a size 12, which is snug around the belly and hip area. But you know what? It's a bit less snug than when I first did up the main seams a couple weeks ago. Another month or two of workouts with Tony *, and it might even be wearable.
* Totally not my idea, but hubbie's into it, so I've been doing it too. Even at my wimpy pace it's having a nice effect.
Thursday, May 20, 2010
A dinosaur bites the dust!
Yup, only 3 fabrics in it: this one's all about the visual effect of purple "monkeys" twining around on a checkerboard background (that, and seeing how far I could push an acceptable color combo). The fabrics are prints, not solids, but "monotonal" in effect:, and quite lovely in person although they don't photograph well:
I still like the idea of this quilt, very much. I doubt I'm the first to make a bi-color "background" for a Monkey Wrench layout, but I came up with the idea on my own, and am happy (in a slapdash way) with how it turned out.
We'll be kind, and call this a "learning" project. If I ever decide to write a tutorial on how not to make a quilt, I can use this one as the example. This was one of the first quilt projects I tackled, and at the time I had no idea how to do things the right way, especially planning which of all those straight edges would be the bias ones. Most likely there are bias/stretch issues however you do it, although from my results I'm guessing I didn't take the best route through that particular jungle.
Don't know if I'll ever feel like tackling this pattern again, but paper foundation piecing would be the way to go, for sure. It's possible I didn't even know what that was way back when. If I had heard of it I didn't know enough to know that would be a good path to take.
More problems can be blamed on a sad combination of misinformation and ignorance. I'd been told, when I bought the machine I began this on, that the edge of the standard foot would result in a nice 1/4" seam for quilting purposes. Silly me: I believed the guy. Being a rank beginner at the quilting game, it didn't occur to me to check. So my seam allowances were all off by a wee bit. A wee bit off on a bunch of seams in some blocks and not many -- or none -- in the others, means my three blocks each came out a slightly different size. Plus, the non-adjstable presser foot on that machine pressed a bit tight, and pushed bias edges even more out of whack.
"Aaaaaaagck!!!" hardly begins to describe my emerging realization of the disaster the blocks were turning out to be, but nicely summarizes why I walked away from it and allowed these blocks to languish in a plastic storage bin for so many years.
Somehow that plastic bin came along for the ride through all my recent moves, waiting patiently for me to be over the trauma,. And there it was when I shopped the stash for fabrics to make a back for the "Nothing Too Girly" lap quilt I'm making for my husband. I saw possibilities in that bin, and enough time had passed that I no longer felt attached to making it come out right.
A little trimming down of the larger pieces, and some liberties taken with tidy seaming, and I was able to mash this together into something that looks (from a distance) almost presentable. Size at this stage is roughly 44"x68". It needs a narrow border all round (probably from the purple; I think I have enough) to come up to size.
Once I've tidied up the edges and added the border, this might even become the front of the "Nothing Too Girly" quilt. I'll let Mr. de Hilo decide which side he likes best.
My goal is to get top, back, and batting sandwiched and basted before putting it away for a bit. No machine quilting is gonna happen around here until I splurge on the table-extension thingie for my machine, which I am saving up for by abiding by the 120-day fabric and pattern embargo currently in effect.
Next up: making a pieced back for the pink lattice quilt I'm making for myself.
... No, I have not forgotten about the Kyoto skirt! Sheesh, it's sprawled all over my ironing board, leering at me. How could I forget it?
I might even sew another little bit of it tomorrow.
Labels:
fabric embargo,
home decor,
NTG quilt,
quilts,
UFOs
Dressing up my desk
No, these are not dinner napkins...
... although they are made just like 'em (cut a large square, make a narrow double-fold hem with neatly mitered corners).
Actually, the red one in the middle is a napkin, "luncheon" size, I'm calling it. That one's becuase I had a small piece of the red colorway lying around, and I figured why not make one more. I eat lunch at my desk a lot. Sometimes that's because I'm on a roll and want to keep going on a project, but more often I'm using my lunch break to blog-surf or catch up on personal emails.
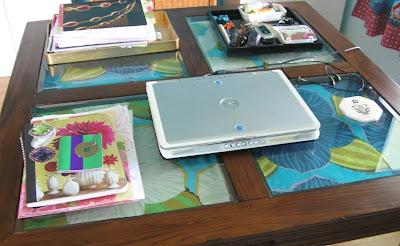
The four large ones are for my desk. Which is really a square dining table, and which has these very cool glass-covered sections. Each is about 15.5" square and 3/4" deep, with a bevelled glass top. The insets have a woven reed lining, which is a blah brown that I've never liked (I am a COLOR fiend, as you may have noticed).
In the past, I've lined these sections with beautiful papers of the heavy/expensive hand-made, gift-wrappy kind, and sometimes I've put little trinkets in there, too. Sort of a 3D collage of pretty things and favorite stuff.
When we last moved, a year ago (yikes, it's been that long?!), I tossed the faded old paper and disassembled everything for packing. Then reassembled here, without doing anything at all in terms of desk decor. Because moving is hassle and a time-eater, and I wanted to get set up and back to business. I figured I'd dress the desk back up in a little bit, when I had the time and felt inspired.
I've had the inspiration/plan for a while now: make some cloth inserts from fabric left over after making my office curtains. But the time-motivation thing didn't happen until this past weekend. When I produced these, cleaned up the desk, and got them in place:
I've had the inspiration/plan for a while now: make some cloth inserts from fabric left over after making my office curtains. But the time-motivation thing didn't happen until this past weekend. When I produced these, cleaned up the desk, and got them in place:
Don't they look nice?
Of course, this is a WORKING desk, and although I like to think I'm a smidge toward the "tidy and organized" end of the spectrum, my desk typically looks something like this:
So glimpses of flowers is what I get. I'm thrilled, though, to have finally crossed this off the "someday" list, and to have a more colorful, cheerful, and inspiring desk to sit at all day.
Now, if you'll excuse me, it's time for me to stop blogging and go get some "real work" done...
Monday, May 17, 2010
Future project #2
Here's one reason I haven't posted any tutorials yet:
I love this ironing board. It's extra wide, and super sturdy. My old one used to collapse on me on a regular basis, which led to much hissing and/or yelling of obscenities on my part and a refusal to ever iron anything. But this one's great. Except that I've been using it for several years now with the default muslin cover that came with it. Which has not stood up well to the great blasts of heat and steam that come from my super-duper iron.
From time to time I start to photograph the steps of something that might become a tute, but inevitably some pressing is involved, and I think, "cr*p, I can't use a photo of this hideous thing."
So, future project #2 is to make a new ironing board cover. Easy project, but the only fabrics in my stash of long enough length are pricey designer cottons that I'm not willing to sacrifice for this purpose (unless the day comes when I decide I'll never get around to making whatever it was I thought I'd sew from them, which is entirely possible but hasn't happened yet).
I'd run right out and get some fabric except I'm about 40 days into a 120-day fabric-and-pattern embargo. And I really mean to stick with it this time.
On the other hand, once the embargo is over, a splurge on a suitable length of something pretty to re-cover the ironing board would make a nice reward for honoring the embargo for the complete term (for once!).
In the meantime, my ironing board remains blotchy and scorched and discolored, and any tute photos that involve pressing will have to wait.
What's that? How's the Kyoto Skirt coming along? Um, well, I sewed up the patch pockets for the muslin this weekend. A grand total of about :10 of sewing time put in over the past several weeks. So it still qualifies as an "active" project (incomplete, but not a UFO just yet), although progress is slow.
What's that? How's the Kyoto Skirt coming along? Um, well, I sewed up the patch pockets for the muslin this weekend. A grand total of about :10 of sewing time put in over the past several weeks. So it still qualifies as an "active" project (incomplete, but not a UFO just yet), although progress is slow.
Sunday, May 16, 2010
Future project #1
Some days you see something you look at every day, and really see it. Or, in this case, you see how faded and ratty it has become.
This little pillow lives on my deck chair, and I'm very fond of it, because of all the many "throw" pillows in the house it is the only one that fits the small of my back just right on this chaise. It was once bright orange/white, with lime green welt around the edge.
It hasn't been anywhere near those colors for some time now. I'd noticed it was fading, just hadn't felt any need to do anything about it. Until this morning. It is now officially "future project #1".
Which doesn't mean I will get to recovering it anytime soon. But I officially acknowledge that it has devolved into an eye-sore, and merits a return to beautiousness one of these days.
I did get to another "someday" project this weekend (and even finished it, thus avoiding the usual consequence of starting something new, which is to add to the UFO pile). Haven't sorted through pics yet, but will show it off shortly.
Subscribe to:
Comments (Atom)


